Archive for the ‘Fabrication’ Category

“Custom made” production of cheap Luer lock adapters for chip-to-syringe interfacing

Stefania Mazzitelli, Stefano Focaroli and Claudio Nastruzzi
Department of Chemistry and Technology of Drugs, University of Perugia, Perugia, Italy

Why is this useful?


One of the standard procedure to pump solutions, emulsions or suspensions, into microfluidic chips is based on the use of syringes, through peristaltic pumps. Syringe pumps are usually preferred over peristaltic ones, for their ease of use, for the accurate and stable control of the flow rate and, finally, for the possibility to employ sterile conditions.

Luer taper is a standardized system of small-scale fluid fittings used for making leak-free connections between a male-taper fitting and its mating female part on medical and laboratory instruments, including hypodermic syringe tips and needles or stopcocks and needles. The fitting is named after the 19th century German medical instrument maker Hermann Wülfing Luer.

There are two varieties of Luer Taper connections: Luer-Lok and Luer-Slip; Luer-Slip fittings simply conform to Luer taper dimensions and are pressed together and held by friction (they have no threads). Luer components are manufactured either from metal or plastic and are available from many companies worldwide but they are usually sold in few standard dimensions and are relatively expensive.

In this Tip we present a way to easily produce a variety of “on demand” Luer connectors, including: (a) female Luer x female Luer adapter, (b) female Luer x female Luer elbow, (c) male Luer x male Luer adapter, (d) male Luer x male Luer elbow, (e) male Luer x female Luer coupler and finally (f) male Luer x female Luer elbow.

What do I need?


  • 1-30 mL polypropylene syringes (Artsana, Italy) [1]
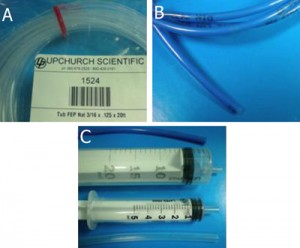
  • tubing: Upchurch Scientific® FEP (fluorinated ethylene-propylene); Tub FEP Nat 3/16 x .125 x 20ft (Upchurch Scientific, UK; No.: 1524) [2]
  • tubing: Timmer-Pneumatik GmbH; H-PTFE-4/2 mm (OD/ID)-blue, catalog Timmer 2001 [3]
  • Aesculap scalpel blades fig. 23, carbon steel, package of 100 pieces in dispenser package [4]
  • Aesculap scalpel handle fitting no. 4 for blades 18-36, 135 mm, 5 ¼, [5]
  • Black & Decker heat gun, model kx1693, [6]

What do I do?


1. Tubing (A, B) and template syringes (C) are used for the production of Luer connectors. A: FEP (fluorinated ethylene-propylene) tubing; B: H-PTFE tubing.

Figure 1

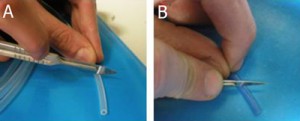
2. Tubing cutting by scalpel. The length of the Luer connector can be adjusted depending on the specific needs of the researcher (for instance, the distance between the syringe pump and the chip). Note that in the case of H-PTFE tube (B), the cutting is made with an angle of 45° with respect to the tube major axis.

Figure 2

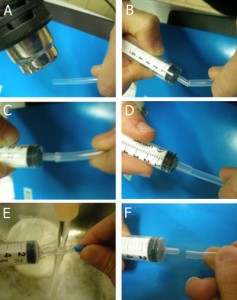
3. Preparation of a female Luer adapter: A. Heating of a FEP tube end by heat gun for 1-3 min; B-D. Press and insert the male Luer of a polypropylene syringe into the heated tube. E. Cool down the tube by tap water. F. Permanent deformation of the tube end.

Figure 3

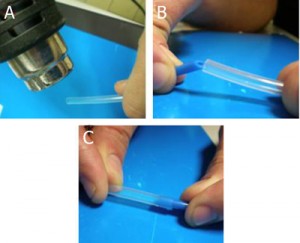
4. Preparation of a male Luer adapter: A. Heating of a FEP tube end by heat gun for 1-3 min; B-C. Press and insert the H-PTFE tube end (cut at 45°) into the heated FEP tube, cool down the tube connection by tap water until a permanent deformation is reached.

Figure 4

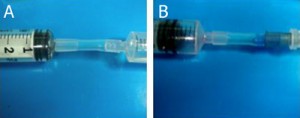
5. Examples of female Luer X female Luer adapter (A) and female Luer X male Luer adapter (B).

Figure 5

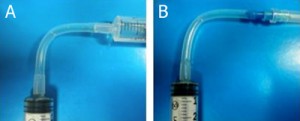
6. Examples of female Luer X female Luer elbow (A) and female Luer X male Luer elbow (B).

Figure 6

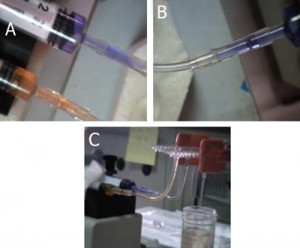
7. Examples of the use of female Luer X female Luer adapter to connect syringes to a commercial chip.

Figure 7

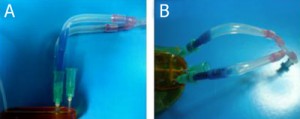
8. Examples of the use of female Luer X male Luer elbow to connect syringes to a homemade chip.

Figure 8

References


[1] http://www.artsana.com
[2] http://www.upchurch.com
[3] http://www.pneumatica-it.timmer-pneumatik.de
[4] http://www.chirurgische-instrumente.info/en/search.html?kw=bb523
[5] http://www.chirurgische-instrumente.info/en/search.html?kw=bb084r

Digg This
Reddit This
Stumble Now!
Share on Facebook
Bookmark this on Delicious
Share on LinkedIn
Bookmark this on Technorati
Post on Twitter
Google Buzz (aka. Google Reader)

A novel method for fabrication of reusable microfluidic interconnects

Koesdjojo, M.T., Mandrell, D.T., Tennico, Y.H., Remcho, V.T.*
Department of Chemistry, Oregon State University, Corvallis, Oregon, USA

Why is this useful?


The lack of an efficient interface, or interconnect, between microfluidic devices and the macroscale world is a major impediment to the broader application of micro total analysis system (µTAS). There are a number of current products and solutions available that seek to address this issue. An example of a simple approach is the direct integration of tubing or a syringe needle into the microchip inlet using epoxy glue.[1] However, direct connection to the inlet reservoir using an epoxy often leads to clogging of the microchannels. Commercially available connections to microfluidic chips and devices, such as the NanoPort from Upchurch Scientific (Oak Harbor, WA, 98277, USA), accommodate these needs by use of a threaded nut and ferrule system. These fittings can be integrated onto chip reservoirs by means of adhesive rings or epoxy glue.[2] The drawback to this method is that NanoPorts require the use of an epoxy glue that takes time to cure and is non-removable, or an adhesive ring that is not compatible with many solvents. Another drawback is that the epoxy requires high temperatures for complete curing, making it incompatible with low glass transition (Tg) polymers.[3] Commercial edge connectors provide efficient interfacing and allow rapid connections and reusability.[4] However, they are designed to be interfaced to a standard microchip format; which limits the compatibility of other chips with different geometries layout or sizes.

This tip presents an alternative approach to making simple, cost-effective universal interconnects. The device was developed to allow for standard compression tubing connectors, such as those available from Upchurch, to be interfaced with microfluidic chips. A standard breadboard fixture was used to compress the ports against the chip to apply sealing pressure, preventing leaks at the interface.  This method allowed for connections to be made without glue, epoxy, or any form of bonding, enabling the components to be easily and quickly reused or reconfigured without the need to machine new fixtures or re-bond ports. The working pressure of these ports was tested with a syringe pump, and withstood pressures in excess of 1000 psi without any signs of leakage or failure.

What do I need?


  • 0.25 and 0.5 inch thick plastic substrates such as polycarbonate (PC)
  • #21, #9 drill bits
  • 10-32 bottoming tap
  • 1mm drill bit
  • 1/16 inch PEEK or Teflon tubing
  • stainless steel 10-32 socket head cap screws
  • 1/32 inch Silicon o-rings
  • Upchurch 10-32 ferruled fittings (F-333)

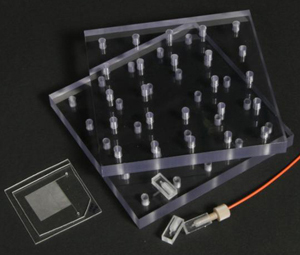
Figure 1. Picture of system components

What do I do?


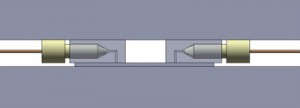
1. The first component was a port which allowed a standard ferruled connector to be attached perpendicular to the microfluidic device.  It contained a threaded portion for the fitting and a fluid path with small port on the bottom for the interface (Figure 2). The port was manufactured using 0.25 inch PC, but can be made of any material thick enough to allow room for the ferruled connector between the compression plates.  It was machined to size using a knee mill.  The threaded port was drilled with a #21 drill bit, then tapped with a 10-32 bottoming tap.  The fluid paths were drilled using a 1mm drill bit (substitute any drill to achieve the desired internal volume).  An o-ring was then placed in the threaded hole to ensure a tight seal against the ferruled fitting.

Figure 2. Interconnect section view (left) and the solid model (right).

2. The second component was a breadboard clamp which applied pressure between the microfluidic device and interconnects (Figure 3). This breadboard approach was particularly useful for prototyping devices having different dimensions and port locations, as interconnects could easily be relocated. A wide variety of bolt locations in the clamping plates allowed for a wide variety of component sizes and configurations. The breadboard clamp assembly was manufactured by cutting 0.5 inch thick PC into two five inch squares.  Using the knee mill, a one inch grid of holes was drilled and taped on one plate with the #21 drill and 10-32 tap.  Clearance holes were drilled on the same grid, using a #9 drill bit, in the second clamping plate.

Figure 3. Side view of a chip, interconnects, and the compression plates.

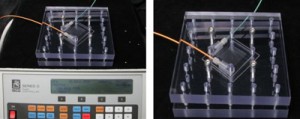
3. The 90° interconnect ports were placed on each of the reservoir holes of a microchip. The ferrules were connected to their respective tubing.  The top plate of the breadboard clamp was installed and using the holes closest to the sides of the chip, 10-32 stainless steel screws were inserted to apply even pressure by clamping the entire fixture.  Figure 4 shows the setup used to pressure-test the manufactured ports.

Figure 4. Setup used for pressure testing (left) and the close up view of a chip in the device (right).

References


[1] T. Das, Interfacing of microfluidic devices, Chips & Tips (Lab on a Chip), 27 February 2009.
[2] http://www.upchurch.com/
[3] J. Greener, W. Li, D. Voicu, E. Kumacheva,  Reusable, robust NanoPort connections to PDMS chips, Chips & Tips (Lab on a Chip), 8 October 2008.
[4] http://www.dolomite-microfluidics.com/

Digg This
Reddit This
Stumble Now!
Share on Facebook
Bookmark this on Delicious
Share on LinkedIn
Bookmark this on Technorati
Post on Twitter
Google Buzz (aka. Google Reader)

How to prevent sagging during the bonding or lamination of chips with large aspect ratio chambers

Jie Xu and Daniel Attinger
Laboratory for Microscale Transport Phenomena, Department of Mechanical Engineering, Columbia University, New York, NY 10027, USA

Why is this useful?


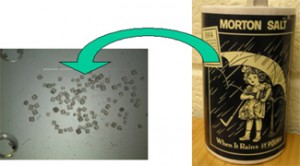
Assembling multiple layers by bonding or lamination is a simple way to manufacture complex multilayer microfluidic chips [1, 2].  However, bonding or lamination of chambers with large aspect ratio, i.e. wide and shallow, sometimes fails because of sagging. Figure 1 illustrates a sagging problem, which resulted in the top chamber wall being accidentally bonded to the bottom wall.  Here, we describe a tip to prevent sagging by using regular cooking salt.

Figure 1: Accidental bonding due to sagging

What do I need?


  • Cooking salt (grain size: normally 300 microns, can be further ground to less than 100 micron; melting temperature: 801 °C, good for lamination)
  • Precision tweezers
  • Stereomicroscope

What do I do?


1. Carefully pave the bottom of the chamber with ordinary salt as in Figure 2. Try to perform this action using fine tweezers under a stereomicroscope, if the chamber is too small.

Figure 2

2. Plasma bond or laminate the top layer. Be careful during handling, so that the salt does not end up in your DRIE machine.

Figure 3

3. After bonding is done, flush the microfluidic system with deionized water for several minutes to dissolve and remove salt particles. As figure 4 shows, the bonded chamber does not exhibit adhesion between the top and bottom wall.

Figure 4: No accidental bonding

References


1. J. Xu and D. Attinger, Drop on demand in a microfluidic chip, J. Micromech. Microeng., 2008, 18, 065020.

2. P. J. Hung, P. J. Lee, P. Sabounchi, N. Aghdam, R. Lin, and L. P. Lee, A novel high aspect ratio microfluidic design to provide a stable and uniform microenvironment for cell growth in a high throughput mammalian cell culture array, Lab Chip, 2005, 5, 44-48.

Digg This
Reddit This
Stumble Now!
Share on Facebook
Bookmark this on Delicious
Share on LinkedIn
Bookmark this on Technorati
Post on Twitter
Google Buzz (aka. Google Reader)

A method for rapid fabrication of microfluidic devices

Rajan Kumar, Robin L. Smith and Michael G. Pappas
Genome Data Systems, Inc., Hamilton, NJ 08610, USA

This Tip describes a useful variation on Holmes and Goddard’s method for rapid fabrication of microfluidic devices.[1]

Why is this useful?


Often, researchers need simple microfluidic devices with uniform height fabricated at short notice. Researchers also need to form channels to enclose materials deposited on glass surfaces, such as microarrays. A number of rapid prototyping methods are not compatible with these requirements. Holmes and Goddard have described an easy method for such preparing microfluidic flow systems.[1] We present a modification of this method using 3M double-sided permanent tape and heat curing with an inexpensive heat press. The resulting devices have a uniform height of ~80 micrometers. We have used such devices for microparticle assays and fluorescence microarrays in our laboratory.

What do I need?


  • Glass slide or other bottom plate substrate, e.g. plastic
  • Top plate substrate
  • 3M double-sided permanent tape 665 [2]
  • 3M double-sided removable tape 667
  • HobbyLite® T-shirt transfer press (Hix Corp., Pittsburg, KS)
  • Cutting board, razor blade, tweezers


What do I do?


1. Turn on the HobbyLite press and allow it to reach a temperature of about 100°F.

2. Draw the outline of the bottom plate (glass slide) on the cutting board. Draw the channel outline within the bottom plate outline.

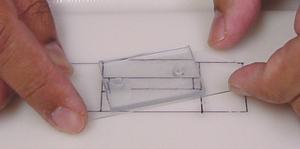
3. Attach the glass slide to the cutting board over the outline using a piece of removable, double-sided tape (Figure 1). This step prevents the glass slide from moving.

Figure 1

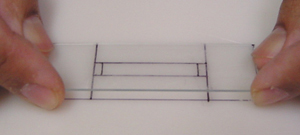
4. Attach a piece of double sided permanent tape to the top of the glass slide, covering the channel outline and leaving enough space on all sides of the channel for bonding (Figure 2).

Figure 2

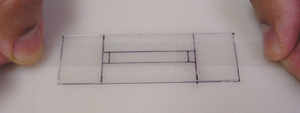
5. Cut out the double-sided tape from the channel outline using a sharp razor blade (Figure 3).

Figure 3

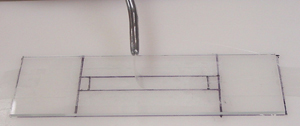
6. Lift one corner of the tape cut-out using the edge of the razor blade, then lift the tape cut-out with the tweezers (Figure 4).

Figure 4

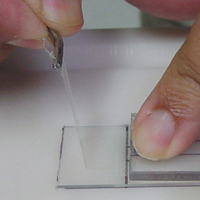
7. Place the top plate on the slide, carefully aligning ports with the channel. Press down to ensure adhesion.

8. Cut excess double-sided permanent tape from each end of cover plate and remove with tweezers (Figure 5).

Figure 5

9. Gently twist and lift the glass slide off the cutting board (Figure 6).

Figure 6

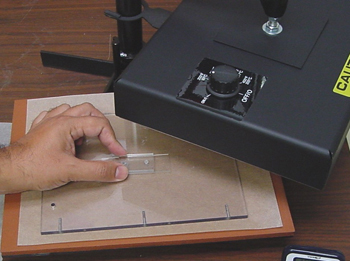
10. Place the assembly in the HobbyLite press and gently apply pressure for 5-10 minutes (Figure 7). Be careful not to apply too much pressure or glass materials may crack.

Figure 7

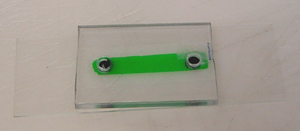
11. Remove the assembly from the press and allow it to cool to room temperature before use (~15 minutes). A completed device chamber filled with dye is shown in Figure 8.

Figure 8


Acknowledgements


This research is funded by an NIH grant GM078945 awarded to Genome Data Systems, Inc.

References


1.  R. J. Holmes and N. J. Goddard, Rapid prototyping of microfluidics, Chips & Tips (Lab on a Chip), 15 February 2007.
2. 3M Scotch® Double-Coated Tape 665 Permanent.

Digg This
Reddit This
Stumble Now!
Share on Facebook
Bookmark this on Delicious
Share on LinkedIn
Bookmark this on Technorati
Post on Twitter
Google Buzz (aka. Google Reader)

Simple and reversible bonding of glass to glass, quartz and sapphire wafers

Javier Atencia and Laurie E. Locascio
Biochemical Science Division, National Institute of Standards and Technology

Why is this useful?


We present a simple method to bond glass wafers reversibly by recreating the bonding that occurs occasionally among glass slides coming from a new box. Typically, the bond is clear without fringes, indicating that the wafers are in close contact, and the bond is so strong that it is impossible to separate the slides with bare hands, though it is not permanent; the slides can be separated with a razor blade.

This type of bonding is called “optical contact” or “direct-bonding”[1] (Isaac Newton was the first to observe it) and has been used extensively in the past, primarily in the optical field.[2] It has also recently been proposed for microfluidic chips using two polished glass wafers.[3]  Different protocols to induce optical bonding differ in the amount of labor and the bonding yield. The main advantages of this type of bonding include the following: the bond can be reversible; the method works with materials of different thermal expansion (it does not require heating); and the method does not require adhesive materials.

Here we introduce a simple, quick and reproducible realization of this type of bonding for microfluidic applications.

What do I need?


  • Two polished 3″ circular wafers (surface roughness <5Å ), one of them with etched patterns on one side (there are many protocols in the literature) and through holes to access the patterns. (For other wafer geometries see the final section of this Tip.)
  • A bath for piranha etching or RCA cleaning, and appropriate personal protective equipment.
  • Cassette for 3″ wafers and a spin-dryer for wafers (if one is not available, see the final section of this Tip), e.g. Semitool-101.
  • Two neodymium magnets.

What do I do?


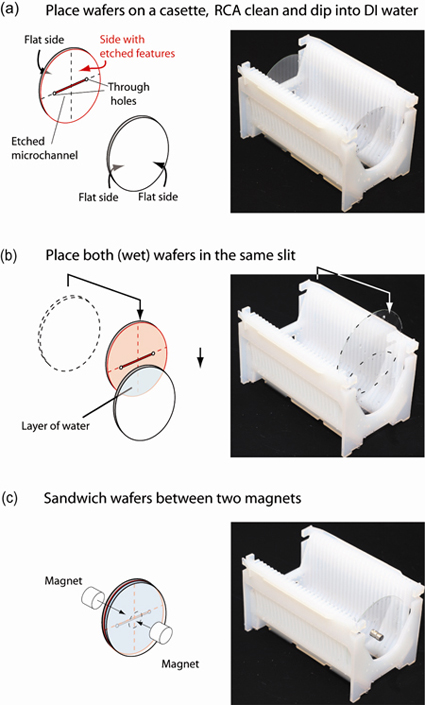
1. Place the glass wafers into different cassette slits (as usual), and place the cassette into the bath for RCA cleaning or Piranha cleaning (typically for 10 min.), Fig. 1(a).

2. Remove the cassette from the cleaning bath and place it in a bath of deionized water (for approx. 10 min.).

3. Remove the cassette from the deionized water bath, take one of the wafers out of its slit and place it into the same slit as the other wafer, taking care that the side of the wafer with the etched channels faces the other wafer.  The two glass wafers should attach to each other by capillary forces and have a thin layer of water in between, Fig. 1(b). Care should be taken not to touch the sides of the wafers that will be in contact.

4. Carefully place two strong magnets on either side of the wafers that are in contact, thus sandwiching the wafers, Fig. 1(c). The magnets should be centered on the wafers.

5. Run the automatic protocol for spin-drying the wafers. The centrifugal force removes the liquid layer between the wafers, bringing them into close contact.

6. Remove the bonded wafers from the spin-dryer and remove the magnets.  The microfluidic device is ready for use. (If the device will be used several hours later it is best to leave the magnets on the device until use.)

Figure 1. Preparation of glass wafers before spin-drying.

What else should I know?


Gas bubbles. Sometimes small gas bubbles may remain between the glass wafers after spinning. These bubbles can usually be removed by pressing on the glass wafers with your gloved fingers and driving them to the edges.

Reversible bond. If there are impurities such as small particulates between the wafers, the device will not bond well.  In this case, a razor blade can be used to separate the wafers. Clean the wafers again and repeat the operation.

Bonding Strength. We tested this bonding method using glass microchannels (500 micrometers wide) with a lid made of glass (borofloat), and found that it withstood pressures of 207 kPa (30 PSI) consistently without rupture 24 h after spinning.  We also tested a glass-sapphire and a glass-quartz bond and found that both consistently withstood pressures of 138 kPa (15 PSI).

Repeatability. We have used a device for months with this bonding without failure. We have also repeatedly separated the wafers with a razor blade, cleaned them, and bonded them again successfully for reuse.

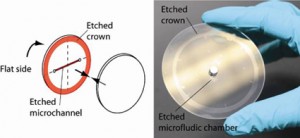
Surface quality. For this method to be successful, it is critical that the surface roughness is less than 5Å. If the wafers are not flat at the edges, etching a “crown” around the edges while etching the microchannels ensures proper bonding, see Fig. 2.

Figure 2. Example of etched crown to eliminate defects at the edges that prevent bonding.

Aspect ratio of etched features. Because there is no thermal bonding, high aspect ratio devices can be fabricated without collapse of the features. For example, we created a circular chamber 500 nm deep and 1.5 mm in diameter, without collapse.

Temperature. We have used these devices at room temperature only, and expect them to fail if higher temperatures are employed due to thermal stresses – particularly when the device is made of two different materials.
No spin-dryer system or different wafer geometries

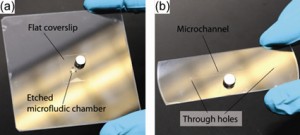
If a spin-dryer is not available, or if the wafers are different from each other or are not circular (see examples in Fig. 3), the same protocol can be used without spinning. However, in this case one should wait at least 24 h before using the device to allow the layer of water between the wafers to dry.

Figure 3. Bonding between flat glass pieces of non-circular geometries.

Acknowledgements


We are thankful to G. Cooksey for the photographs displayed in the figures.

Part of this work was performed at the NIST Center for Nanoscale Science and Technology Nanofab, which is partially sponsored by the NIST Office of Microelectronics.

References


[1] J. Haisma, N. Hattu, J. T. C. M. Pulles, E. Steding and J. C. G. Vervest, Appl. Opt., 2007, 46 , 6793-6803.

[2] V. Greco, F. Marchesini and G. Molesini, J. Opt. A: Pure Appl. Opt., 2001, 3, 85-88.

[3] Z. J. Jia, Q. Fang and Z. L. Fang, Anal. Chem., 2004, 76, 5597-5602.

Digg This
Reddit This
Stumble Now!
Share on Facebook
Bookmark this on Delicious
Share on LinkedIn
Bookmark this on Technorati
Post on Twitter
Google Buzz (aka. Google Reader)

An inexpensive and durable epoxy mould for PDMS

André Estévez-Torres, Ayako Yamada and Li Wang
Department of Chemistry, Ecole Normale Superieure, Paris, France.

Why is this useful?


To create microfluidic patterns on PDMS one usually pours PDMS on a mould composed of microfabricated resist features on top of a Si or glass wafer. However, these resist moulds are fragile and usually break after a few uses, making it necessary to perform microfabrication again. Transferring the microfabricated features to an epoxy mould conserves the resolution down to 1 µm[1] and allows: i) multiple and inexpensive copies of the mould, ii) hundreds of uses without significant ageing, iii) easy incorporation of macroreservoirs to the PDMS device without needing to punch them every time, and iv) isopropanol cleaning, which is not possible with AZ resists.

What do I need?


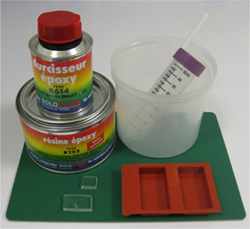
    Figure 1. Materials

  • Resist mould
  • PDMS
  • Silicone cake mould (e.g. SF025 financiers) from Silikomart (Mellaredo di Pianiga, Italy)
  • Epoxy resin (type R123, Bisphenol A/F epoxy resin) and hardener (type R614) from Soloplast-Vosschemie (Saint Egreve, France) or EasyCast Clear Casting Epoxy from Castin’Craft, Environmental Technology[2]
  • Trichloromethylsilane
  • Plasma cleaner

How do I do it?


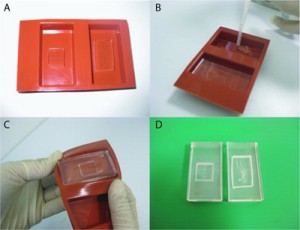
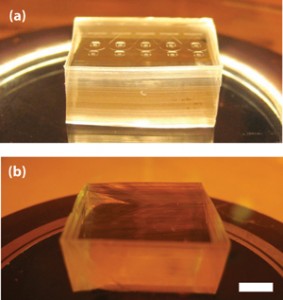
Figure 2. A) PDMS masters on the bottom of silicone cake molds. B) Pouring epoxy over PDMS masters. C) Peeling the epoxy+PDMS brick off the cake mold. D) Resulting epoxy molds.

1. Pour PDMS on the resist mould and cure it as you usually do.
2. Peel off the PDMS layer from the resist mould. Punch the macroscopic reservoirs if you need them. This PDMS part will be called PDMS master.
3. Put the PDMS master (microfabricated features on top) on the bottom of the silikomart cake mould. You may clean it with 3M tape.
4. Prepare the epoxy mixture as recommended by the manufacturer and remove the bubbles by vacuum pumping or ultrasonication.
5. Pour the epoxy mixture on the cake mould containing the PDMS master until you cover it with 2-3 mm of epoxy. Be careful to avoid making bubbles. If you are moulding small features you probably need to remove bubbles by vacuum pumping.
6. Wait for 24h at room temperature.
7. Remove the epoxy+PDMS brick from the mould and then peel off the PDMS master from the epoxy using a scalpel and tweezers. It peels off very easily.
8. The epoxy mould may be a little soft at this stage. Bake it in an oven at 70°C for one day – it becomes softer – and let it harden at room temperature for another day.
9. Silanize the epoxy mould by keeping it in a closed petri dish with a trichloromethylsilane-saturated atmosphere for 5 min. The first time you use the epoxy mould to make a PDMS device you need to put it into a plasma cleaner before silanization.
10. Pour PDMS on the epoxy mould as you usually do with other moulds. Cure it in the oven following your favourite recipe and peel it off. The first peel off needs to be performed slowly and carefully. Subsequent peelings off are straightforward.

Figure. 3. Optical microscopy image of A) PDMS master, B) epoxy mold and C) PDMS molded on epoxy. The images are 300 µm wide and the smallest feature is 10 µm.

References


[1] This type of technique, called replica moulding, has been reported to yield features down to 100-50 nm (Y. Xia et al., Replica moulding using polymeric materials: A practical step toward nanomanufacturing, Adv. Mater., 1997, 9, 147-149).
[2] http://www.eti-usa.com

Digg This
Reddit This
Stumble Now!
Share on Facebook
Bookmark this on Delicious
Share on LinkedIn
Bookmark this on Technorati
Post on Twitter
Google Buzz (aka. Google Reader)

Profile measurement for microstructures made in hard material

Jie Xu and Daniel Attinger
Laboratory for Microscale Transport Phenomena, Department of Mechanical Engineering, Columbia University, New York, NY 10027, USA

Why is this useful?


Precise cross-section measurements are very important for microfluidic structures, such as micro-channels, chambers, pillars. However the manufacturing process can be imprecise in terms of channel depth (soft lithography, micro-milling) or channel width (micro-milling). A profilometer can be used after manufacturing, but the maximum depth is usually limited and the tip cannot probe channels thinner than 5 microns. Therefore, we present a way to easily measure the cross-section of microstructures made in hard material, such as SU-8, PMMA and silicon, in a large range of sizes.

What do I need?


  • PDMS and its fabrication equipment, e.g. vacuum pump, heater and aluminium foil
  • Razor blade
  • Microscope

What do I do?


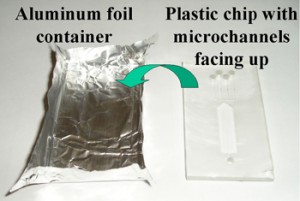
1. Put your chip with microstructures facing up in an aluminium foil container [1].

Figure 1

2. Pour a 2-3mm thick PDMS layer on top of the chip and cure it. A vacuum might be needed to remove the bubbles in the PDMS, if your features are small.

3. Peel off the PDMS and cut it at the location of your interest. Try to perform the cut under a stereomicroscope, if you feel it hard to locate your razor blade precisely.

Figure 2

4. Use the microscope to visualize the cross-section of the cut PDMS, and all the dimensions can be measured from the image.

Figure 3

References


[1] A. O’Neill, J. Soo Hoo and G. Walker, Rapid curing of PDMS for microfluidic applications, Chips & Tips (Lab on a Chip), 23 October 2006.

Digg This
Reddit This
Stumble Now!
Share on Facebook
Bookmark this on Delicious
Share on LinkedIn
Bookmark this on Technorati
Post on Twitter
Google Buzz (aka. Google Reader)

Rapid prototyping of a PMMA microfluidic chip with integrated platinum electrodes

Martin Arundell, Adai Colom Diego, Óscar Castillo, and Josep Samitier
Nanobioengineering group, Institute for Bioengineering of Catalonia (IBEC), Baldiri Reixac 10-12, 08028 Barcelona, Spain

Why is this useful?


This is a very quick and useful method for researchers who do not have access to high tech micro-fabrication facilities and want to try out an idea or a test in a quick, cheap and simple fashion. In this case it is for those of us who want to test certain techniques such as in-channel electrochemical, conductivity or impedance measurements. It also saves time and costs from using high tech fabrication techniques and will aid the researcher in future designs that can then be fabricated the more conventional way in a clean room. In addition, it is a cheap and effective way of introducing undergraduate and masters students to various chip techniques.

What do I need?


  • An oven that will go up to about 150 °C
  • Metal clamp with smooth surfaces (the clamp surfaces should be at least 25 by 50 mm). Obviously this depends on the size of the chip you require.
  • Tungsten 125 µm wire (Advent) and a pair of good pliers
  • Platinum 50 µm wire  (Advent)
  • PMMA 500 µm thick sheets (Goodfellow)
  • Solder
  • Araldite 2014 epoxy adhesive Glue
  • Stanley (utility) knife

What do I do?


1. The first thing to do is to cut the PMMA sheets depending on the sizes you require and your clamp size.

2. Two 1 mm holes should then be drilled on either side of the PMMA device depending on the length of the channel required as shown in Figure 1.

Figure 1

3. Approximate where you would like to place your electrodes and make small slits with a Stanley knife on either edge of one of the PMMA pieces. The number of slits you make depends on how many electrodes you require for your device.

4. The next step is to place the electrodes (as many as you require) onto the chip and carefully position them into the slits, indicated by the arrow in Figure 2. We used 50 µm platinum wires but any size can be used. The larger the wire the easier it is to place the wires on the chip.

Figure 2. Slits containing the integrated electrodes

5. Then heat up a soldering iron and lightly touch one of the sides of the PMMA chip where the wires are placed in the slits. The soldering iron heats up the wire and slightly melts the PMMA, making it more snug in the slit. This will hold the wire in place and allow you to pull it taught to the other side where it can be permanently bonded in the other PMMA slit. Repeat this step for each electrode.

6. Although the wires are taught it is still possible to re-position them slightly (using the tweezers) depending on the required gap. We were able to get inter-electrode distances down to about 50 µm.

7. The next step is to make a channel and we used a 125 µm tungsten wire (straight cut lengths) for this. See Figure 3.

Figure 3. The tungsten wire (arrow) is positioned with respect to the reservoir holes. The small pieces of tape were used to temporarily keep the two pieces of PMMA together before the fabrication procedure in step 8

8. To make the clamping of the device more simple the procedure below should be followed. First, the clamp should be placed on one end so that the PMMA piece with the integrated electrodes can be easily placed on the bottom part of the clamp. The tungsten wire can then be placed on top of the integrated electrode PMMA piece and then a blank PMMA piece placed on top of this. The tungsten wire can then be positioned into place so that it lines up with the drilled holes. The clamp can then be firmly tightened and placed in a pre-heated oven at 140 °C. After 5 minutes the clamp is re-tightened and placed in the oven for a further 10 minutes.

9. The PMMA device can then be removed from the oven and the bonded chip can be removed from the clamp. The tungsten wire can then be removed from the PMMA device and glue can be applied to seal up the open end. When the wire was removed from the PMMA device a channel was formed without disturbing the electrode array. This was carried out a number of times with good reproducibility.

10.  Figure 4 shows the resulting channel with integrated electrodes.

Figure 4a. The channel and integrated electrodes (arrow).

Figure 4b. Zoomed-in view of the two electrodes crossing a microchannel. In this case the approximate distance between the 2 electrodes is 260 µm.

11. Wires can then be attached by using a solder or silver epoxy to the platinum electrode wires. To strengthen the connections it is best to glue the insulation part of the connecting wires to the body of the PMMA, as shown in Figure 5.

Figure 5. Chip with integrated electrodes (arrow) and glued connecting wires.

What else should I know?


The devices fabricated using the method above were tested using capillary electrophoresis and pressure-driven flow. In both cases they worked very well and the performance of the electrodes was tested using impedance measurements. This worked well by injecting a 1:10 diluted PBS buffer into a concentrated PBS buffer solution and measuring the change in conductivity. No leakages were observed and a good signal resulted from the test. In addition, using the same method, it was also possible to fabricate the chips with cross channels for electrophoretic injection. The cost of materials was approximately €200 for 5 of the 300 x 300 mm x 500 µm thick PMMA sheets from Goodfellow. The 50 µm platinum wire (5 m in length) was ordered from Advent and cost approximately €120 and the 125 µm tungsten straight short wires cost approximately €80 for 100 pieces. Total cost for the wires is about €400 which would make about 100 chips at an approximate cost of €4.00 per chip.

Digg This
Reddit This
Stumble Now!
Share on Facebook
Bookmark this on Delicious
Share on LinkedIn
Bookmark this on Technorati
Post on Twitter
Google Buzz (aka. Google Reader)

Lamination of plastic microfluidic devices

Daniel Olivero and Z. Hugh Fan
Department of Mechanical and Aerospace Engineering, University of Florida, Gainesville FL, USA

Why is this useful?


Bonding is a critical step in fabricating plastic microfluidic devices.[1] It is a process to seal microfeatures (e.g. channels) in a plastic substrate with a cover film. Lamination is one of the best methods to achieve a successful bond, with no air bubbles between the plastic substrate and film, no distortion of microfeatures, and minimum deformation of the device.[2] The parameters affecting the quality of lamination include the heating temperature, the pressure placed on the assembly, and the lamination process.[2] This tip describes using a commercially available, tabletop, roller laminator to seal a plastic substrate with a cover film. The plastic substrate (1.5 mm thick) is made from a cyclic olefin copolymer (COC) resins (Zeonor® 1020) and the film is a 100 µm thick COC film (Topas® 8007).

What do I need?


  • A plastic substrate with microchannels (1″ x 3″)
  • A thin film (1″ x 3″)
  • Metalized Mylar films
  • A hot plate
  • A conventional laminator (GBC® Catena 35, Lincolnshire, IL)

The set up


Figure 1.

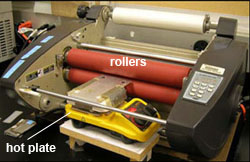
To preheat the plastic substrate to a temperature close to the lamination temperature, the laminator is modified as follows. The feed table in front of the rollers is removed and replaced with a hot plate as shown in Figure 1. The hot plate is raised to align the plate surface with the gap between the two rollers. The hot plate is used to preheat the plastic substrate so that it is easier to reach the required temperature for lamination of COC devices.

What do I do?


1. Clean both the plastic substrate and the cover film in purified water in an ultrasonic bath. Then rinse them in acetone and dry them in a clean air in a laminar hood. Make sure that both the substrate and the film are completely dry before proceeding.

2. Assemble the plastic substrate with the cover film. In our case, alignment is not required since all features are in the substrate. If any feature is made in the cover film, accurate alignment is likely needed.

Figure 2.

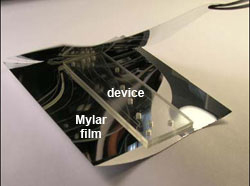
3. Cut two pieces of Mylar sheets sufficiently large to cover both the plastic substrate and the cover film. Place them between two Mylar sheets as shown in Figure 2. The Mylar sheets are used to prevent the texture of the rollers from being transferred to the plastic device, maintaining a smooth surface of both substrate and film.

Figure 3.

4. Place the assembly of the plastic substrate, the cover film and the Mylar sheets on the hot plate. Make sure that the cover film is at the bottom side, so that the heat is easier to be transferred to the interface between the film and substrate. Place a microscope slide and weights (2 x 44 g) on top of the assembly to ensure the assembly is in contact with the hot plate, as shown in Figure 3. The slide allows a uniform pressure placed on the assembly. For the specific plastic substrate and film, the hot plate is set at a temperature of 73ºC. Other plastic materials likely require different temperatures as discussed in the literature.[2,3]  Allow the assembly to be heated for four minutes.

Figure 4.

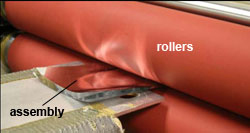
5. After the completion of the pre-heating, remove the weights and the slide from the assembly. The laminator rollers should have been heated to a temperature of 124ºC. The gap between the rollers is set at 3 mm and the roller speed is set at 3 feet/minute. Press the “run” button of the laminator and gently slide the assembly into the rollers. Make sure that the plastic substrate and the film do not become misaligned while sliding. Once the assembly enters the rollers it should move by itself through the laminator as shown in Figure 4. If needed, the device may be rolled through the laminator once more to ensure a complete lamination.

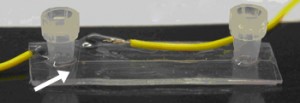
6. Once completed a functional microfluidic device is obtained, as shown in Figure 5. This device was used for two-dimensional protein separation by integrating isoelectric focusing (IEF) and polyacrylamide gel electrophoresis (PAGE).[4] The device was filled with a dye for easy visualization of channels. Note that this lamination method can be used for other types of materials but the variables such as the lamination temperature likely need to be adjusted for a perfect lamination.

Figure 5. Cyclic olefin copolymer device

Acknowledgements


This work is supported in part by the grants (48461-LS and 52924-LS-II) from the USA Army Research Office and the startup fund from the University of Florida.

References


[1] L. J. Kricka, P. Fortina, N. J. Panaro, P. Wilding, G. Alonso-Amigo and H. Becker, Lab Chip, 2002, 2, 1-4.
[2] C. K. Fredrickson, Z. Xia, C. Das, R. Ferguson, F. T. Tavares and Z. H. Fan, J. Microelectromech. Syst., 2006, 15, 1060-1068.
[3] M. L. Hupert, W. J. Guy, S. D. Llopis, H. Shadpour, S. Rani, D. E. Nikitopoulos, S. A. Soper, Microfluid. Nanofluid., 2007, 3, 1-11.
[4] C. Das, J. Zhang, N. D. Denslow, and Z. H. Fan, ZH. Lab Chip, 2007,  7, 1806-1812.

Digg This
Reddit This
Stumble Now!
Share on Facebook
Bookmark this on Delicious
Share on LinkedIn
Bookmark this on Technorati
Post on Twitter
Google Buzz (aka. Google Reader)

See where to punch holes easily in a PDMS microfluidic device

Amy C. Rowat and David A. Weitz
Dept. of Physics/Harvard School of Engineering and Applied Sciences, Harvard University, Cambridge, MA, USA

Why is this useful?


The microfluidic channels in PDMS devices are connected to the macroscopic world by inserting tubing into the inlet holes of flow channels.  We make inlet holes by punching through the PDMS with a razor-sharp biopsy punch to remove a piece of PDMS similar in diameter to the tubing.  However, it is often difficult to see where to punch this hole, especially when channels are shallow in height.  Here we present a tip that makes it easy to see where to punch inlets in PDMS devices by putting a ring light source beneath the device; because the channels scatter the light, the inlets are easy to see.

What do I need?


  • PDMS mold
  • biopsy punch (0.75 mm for PE20 tubing, Harris Uni-Core, Ted Pella, Inc., Redding, CA)
  • piece of glass (borosilicate plate or glass microslide)
  • ring light (Dolan-Jenner Industries, Inc.) [Note: many dissecting scopes are equipped with a ring light; a homebuilt apparatus could also be used.]
  • isopropanol

What do I do?


  1. Peel the PDMS off the master wafer.
  2. Invert the ring light and place the glass slide on top.  [We use the light source from the dissecting scope in our cleanroom.]  Then place the PDMS device on the glass slide with the channels facing upwards (Figure 1).  By moving the device to different positions on the glass plate, different angles of backlighting result making it easier to see the inlets and channels.
  3. When you have located the correct position of the inlet, press the biopsy punch through the PDMS so that it contacts the glass, then turn the punch one quarter clockwise.  Lift the PDMS off of the glass surface, the then depress the button on the biopsy punch to release the PDMS plug.  Be sure that the plug detaches from the device; sometimes the plug can get stuck and obstruct the inlet hole.
  4. Rinse the device thoroughly with isopropanol.  Chunks of torn PDMS get stuck in the holes, so it is important to flush them with solvent.  Dry with filtered air.
  5. Plasma treat the PDMS, bond to glass, and insert tubing.

Figure 1. (a) A glass slide placed on top of an inverted ring light creates a platform that makes it easy to see where to punch holes in a PDMS microfluidic device. The device shown here has channels of 4.5 µm height. (b) In the absence of backlighting, the channels are difficult to see. Scale, 5 mm.

What else should I know?


In addition to backlighting, it also helps to fabricate a pattern in or around the inlet that scatters light.  We typically use a pinwheel pattern inside the hole as well as lines radiating out from the holes as shown in Figure 1.

Digg This
Reddit This
Stumble Now!
Share on Facebook
Bookmark this on Delicious
Share on LinkedIn
Bookmark this on Technorati
Post on Twitter
Google Buzz (aka. Google Reader)