Leonie Bastin1 and Karen Alim1,2
1 Max Planck Institute for Dynamics and Self-Organization, Göttingen, Germany
2 Physics Department, Technical University of Munich, Germany
Why is this useful?
In microfluidic devices with small structures, air bubbles are often trapped at interfaces, corners or structures within the channel. The presented method is reproducible, fast, and only requires an additional ultrasonic bath. Vibrations from the ultrasonic bath detach the bubbles from surfaces. By flushing the chip with water at the same time, the bubbles are transported out.
What do I need?
- An ultrasonic bath
- The microfluidic device
- A syringe filled with water
What do I do?
- Connect the syringe to the microfluidic device.
- Lay the device into the ultrasonic bath and turn it on.
- Manually fill the device with water, varying the pressure in pulses of around a second in length (see inset in Figure 1A). Use high flow rates! In our case, we used flow rates of approximately 50 microliters per second during the pulses.
- Before the syringe is empty, turn off the ultrasound bath, take the device out and check whether there is any air left in the channel.
- If there is air left in the chip, press some water through with high speed when the device is not laying in the ultrasound bath.
- If there are still bubbles left, repeat the procedure.
- Once no bubbles are left in the chip, insert the syringe for your experiment on the other side of the chip. To avoid the appearance of new bubbles, press out some of the liquid so that a drop appears at the outlet before you insert the syringe.
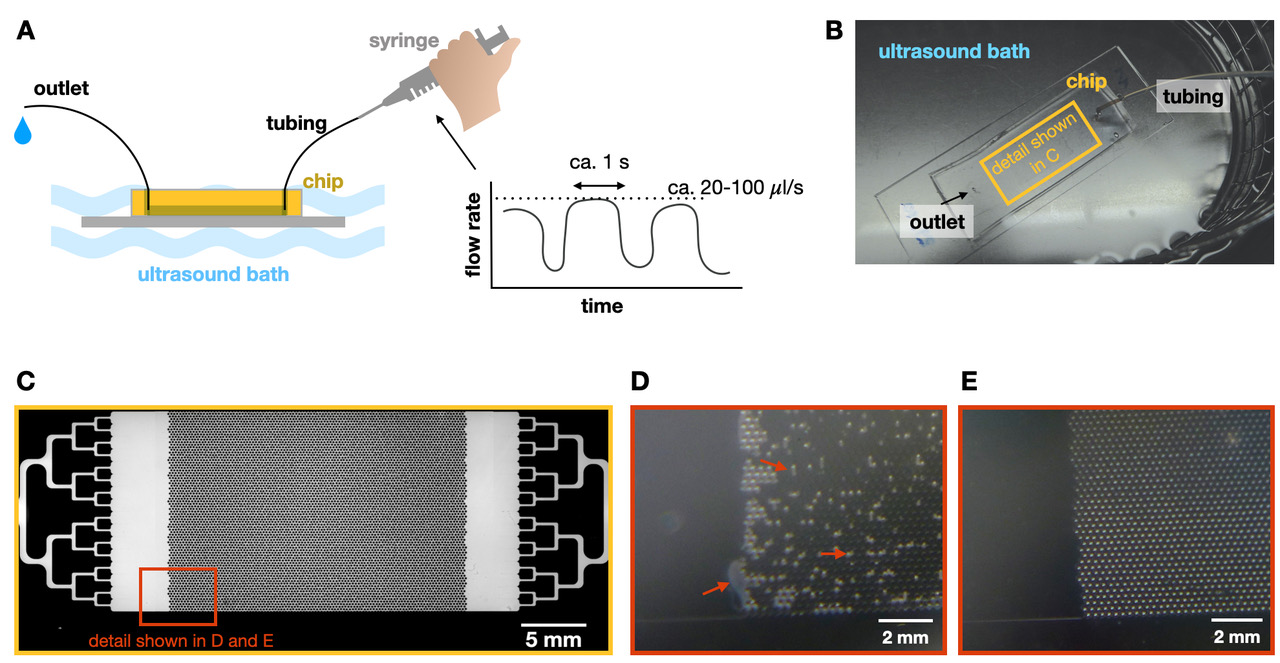
Figure 1: (A) Schematic drawing of the setup. The tubing at the outlet is optional if you fill the chip with water. The manual pressure pulses are sketched in the inset. (B) Photo of the setup without tubing at the outlet. (C) Fluorescence microscopy image of a chip filled with fluorescein to visualise the structure that is shown in D and E only filled with water. The center part is filled with 100 micrometer wide PDMS-pillars, which are arranged in a hexagonal structure. (D) Photo of a small region of the chip when filled with water without using the ultrasound method. Many air bubbles are visible between the pillar structures (arrows). (E) Photo of the same region after using the ultrasound method. No air bubbles are left in the chip.


")