Travis Swaggard1, Johanna Bobrow1, Peter Carr, Isabel Smokelin1, Todd Thorsen1, Christina Zook1, David Walsh1
1MIT-Lincoln Laboratory, 242 Wood St, Lexington, MA 02421
Why is this useful?
Have you ever tried to bond a thin clear bottom to your custom thermoplastic microfluidic device for high magnification microscopy? The bonding process can be cumbersome and relies on the heating temperature, the pressure placed on the device assembly, surface chemistry, as well as many other factors.1 We have developed a method that utilizes a heated laminator press and a UVO oven, which together cost less than hiring an external vendor who will likely charge per design and item manufactured. Currently, manufacturing bonded devices in-house can be difficult, expensive, and time consuming.
The new paradigm in microfluidic device prototyping using high-resolution 3D-printing has significantly reduced the barrier to participate in microfluidics, which traditionally required dedicated infrastructure and specialized expertise.2 However, once the design-build-test prototyping cycle has gone beyond the 3D-printing stage, additional prototyping in thermoplastics (e.g. CNC milling) is typically required for eventual scale-up using traditional hot embossing or injection molding manufacturing techniques. One of the critical challenges at this stage is placing optically-clear bottoms below the thermoplastic microfluidic device for optical interrogation, while withstanding fluidic flow and pressure. For example, adhesive bonding such as using double-sided tape can be tricky and tedious to align, and solvent-based adhesives can be messy or challenging to avoid impacting thin-film clarity, and even pose environmental safety concerns.
We have developed an inexpensive bonding protocol which can utilize almost any commercially available heated machine press to mitigate the aforementioned drawbacks, and bond layers of thin (125 micrometer) acrylic film to any flat acrylic microfluidic device surface. This allows for a strong bond that can provide a clear bottom for high-resolution optical interrogation, such as using a confocal microscope, for example. New low-cost commercial UVO ovens (Jelight Model 18 – $3,000) and heated laminated presses (Nugsmasher $500 [Mini] – $7,000 [Pro Touch]) have helped enable democratization of the thermoplastic film bonding process.
Here is a detailed walkthrough for the preparation and assembly of these devices. We have included photos and figures from each step for reference and convenience.
What do I need?
- Thin, optically clear acrylic film (e.g. Röhm GmbH Acrylite Film 99524 or similar)
- Microfluidic device from cast acrylic (e.g. Protolabs – CNC Machined)
- Scissors
- Oven mitts (or equivalent)
- Multipurpose Neoprene rubber sheet 6”x 6” x 1/16” (or equivalent heat-safe separator)
- Heated lamination press (Premiere Manufacturing SKU: 714343996295 or similar)
- Must apply pressures between 30 and 50 PSI (roughly finger-tight, part won’t move if pushed by a finger)
- Must be able to heat up to 118 °C
How do I do it?
- Using scissors, cut piece(s) of thin, optically clear acrylic film slightly larger than your acrylic device (this will eliminate any alignment steps, you can cut the remaining excess after the device has been pressed). Your film should be about half an inch oversized on all edges of the device to ensure that it is completely covered
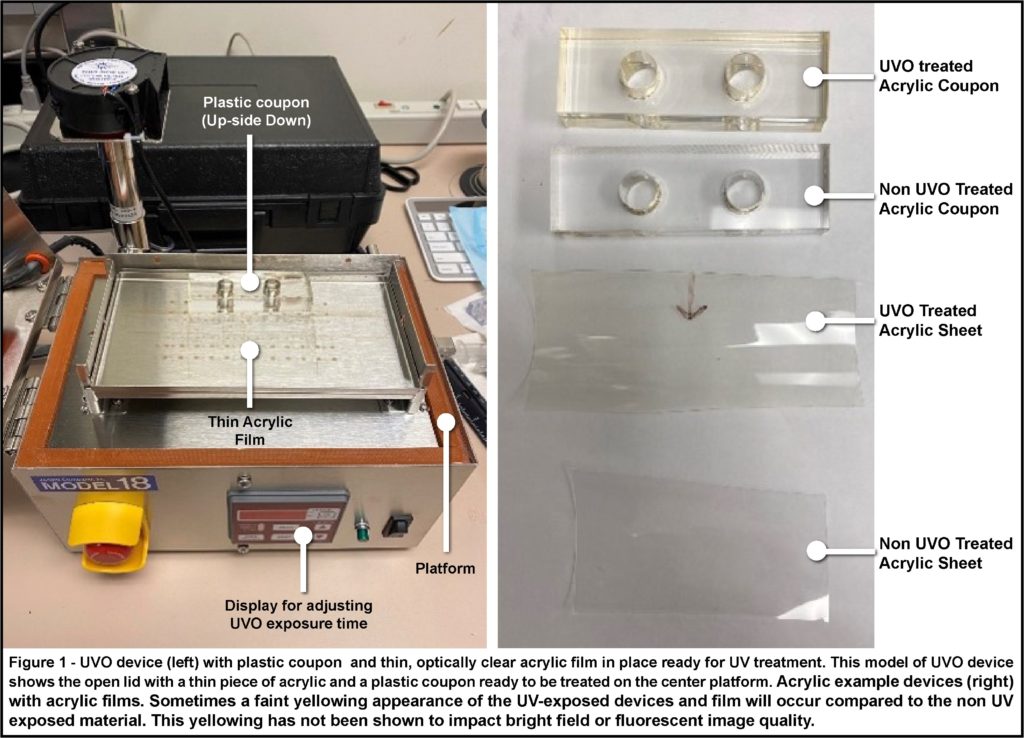
- Place the cutout of acrylic film(s) and plastic device(s) into the UVO oven so they are not touching and run for eighty minutes (see Fig.1). You can also perform oxygen plasma bonding alternatively; however, as that bond weakens over time, it’s important to perform the bonding immediately before the treatment. (Note: Be sure to put the bonding surfaces face-up in the UVO machine for best results.)
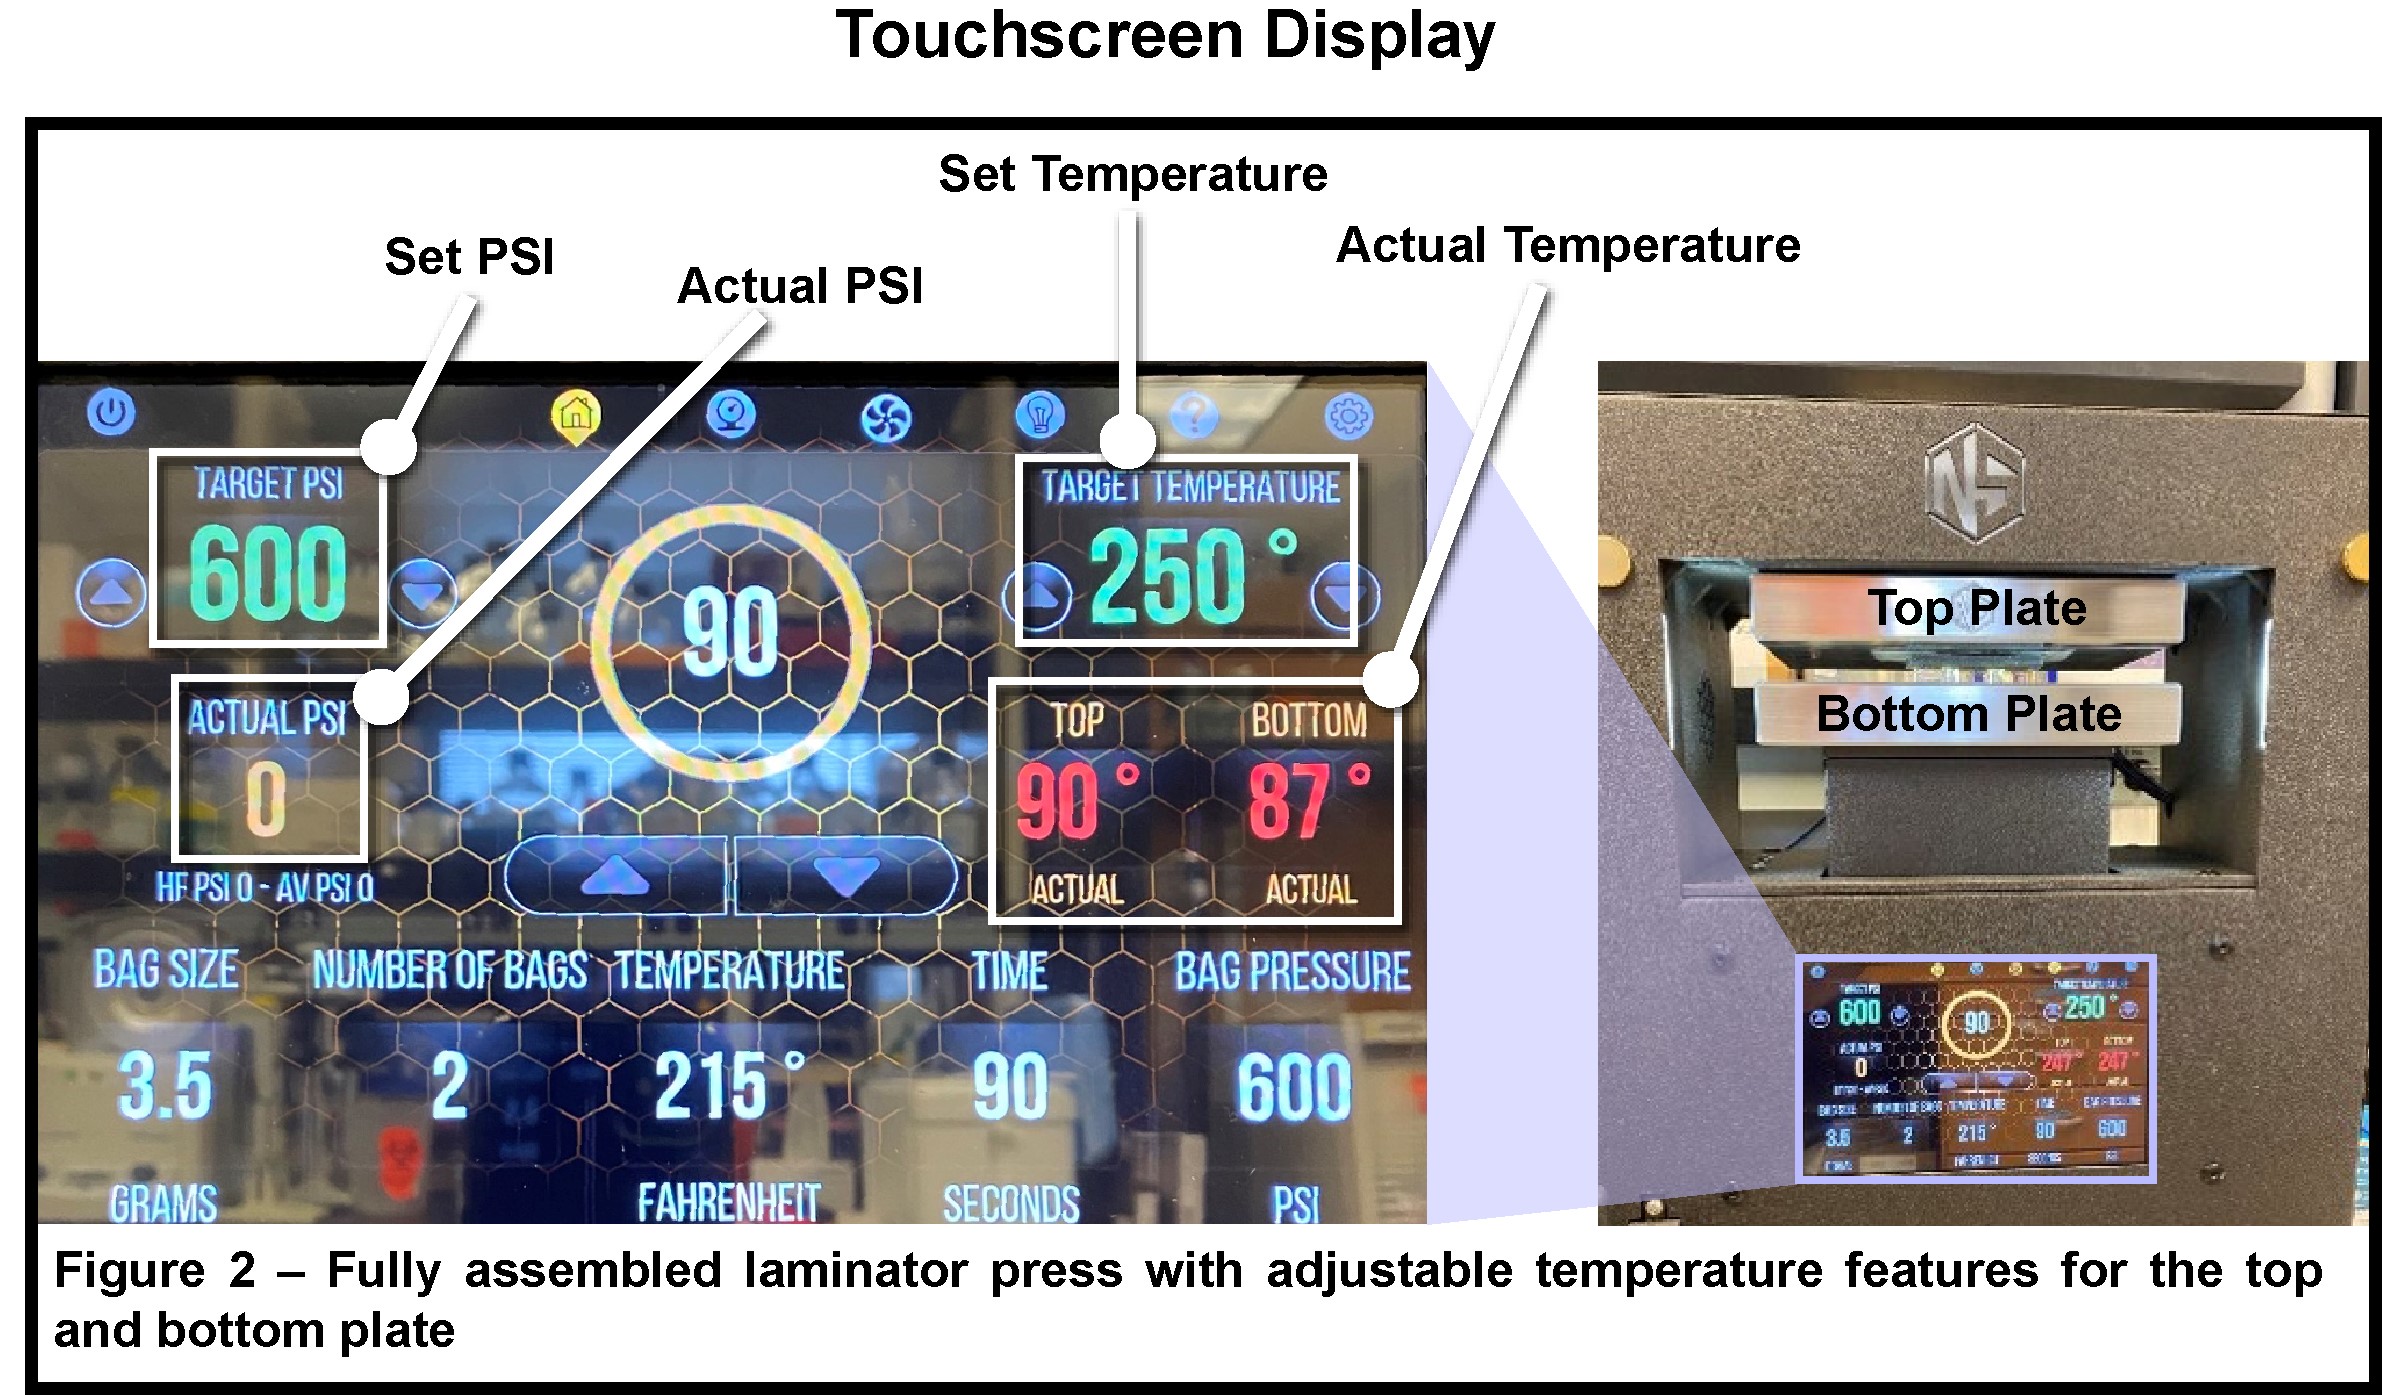
- Preheat laminated press to 118 °C (or about 250 °F). It may take up to twenty minutes to get up to temperature and an hour total to stabilize at the set point (see Fig.2).

- Very carefully (press will be very hot) place thin film on bottom plate and plastic device on top of film (use oven mitts or tongs for safety).
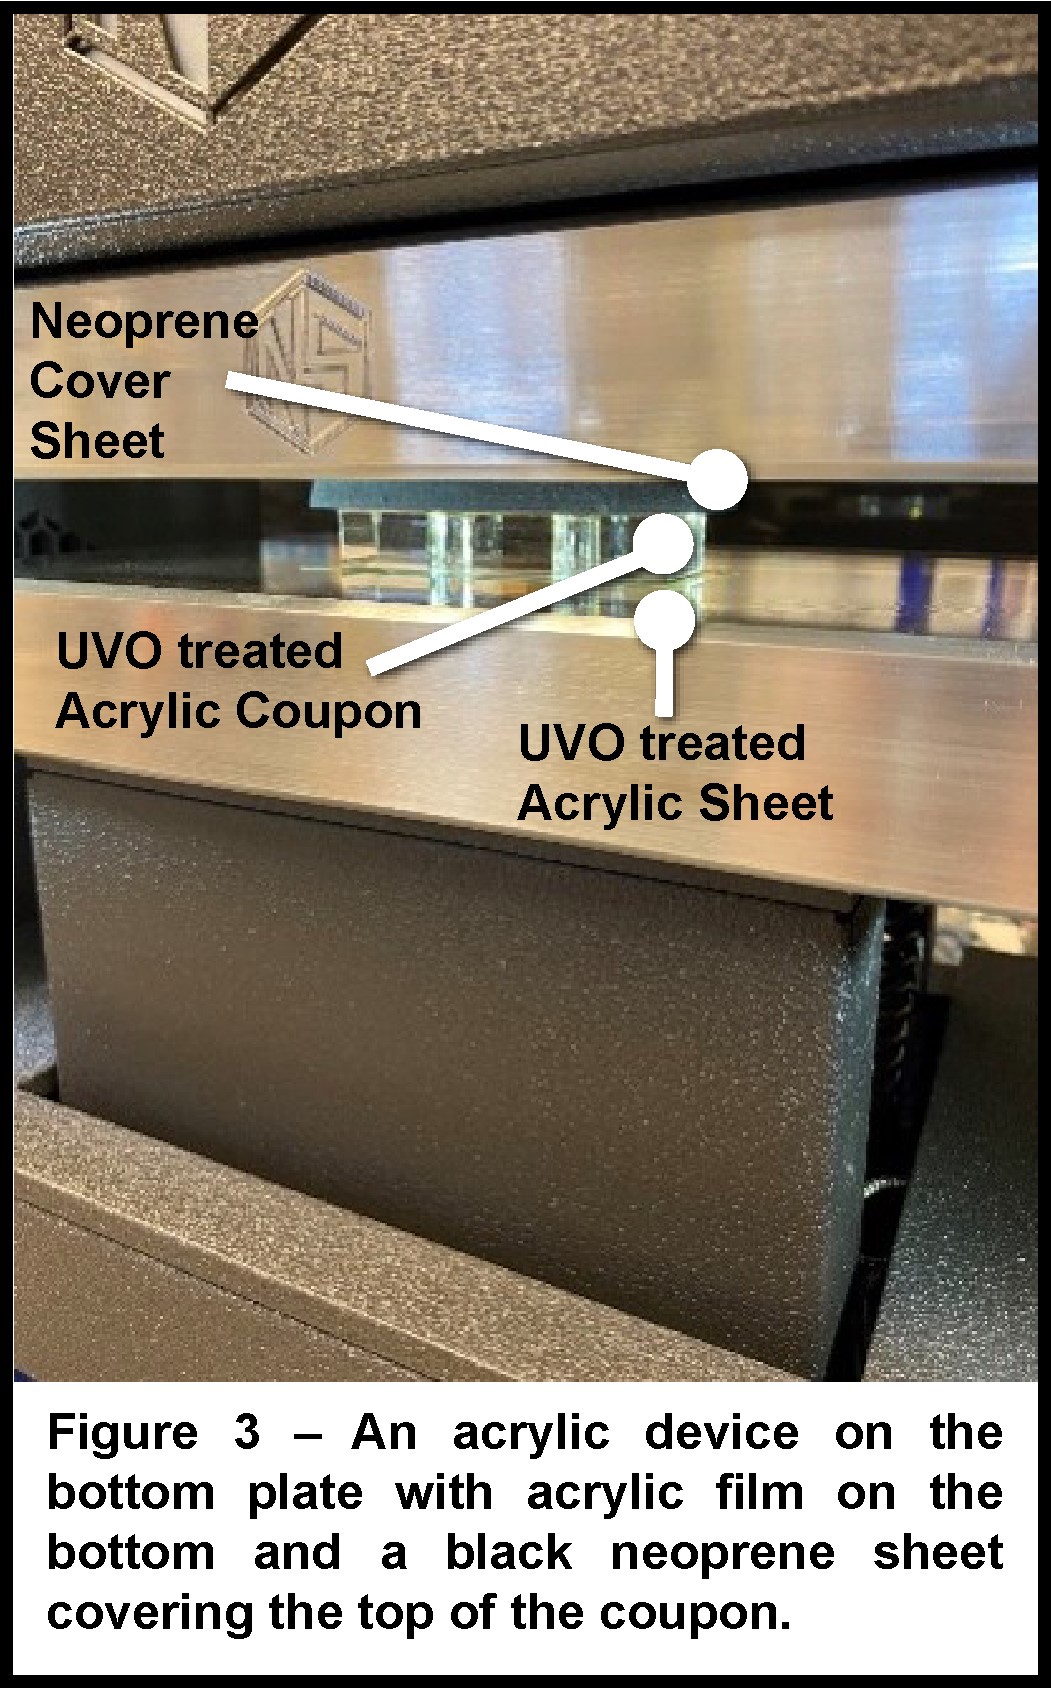
- Place a neoprene cover sheet over plastic coupon/film assembly. This will provide cushioning between the top press and your device and prevent any possible cracking or pitting from the top press (see Fig.3).

- Using the lever crank in the back, apply manual pressure until the machine registers a reading of 30-50 PSI (or roughly finger-tight, so the part won’t move if pushed by a finger or tong).
- Let device sit at steady pressure and heat, hold for ten minutes.
- Turn off heat but keep the device under pressure.
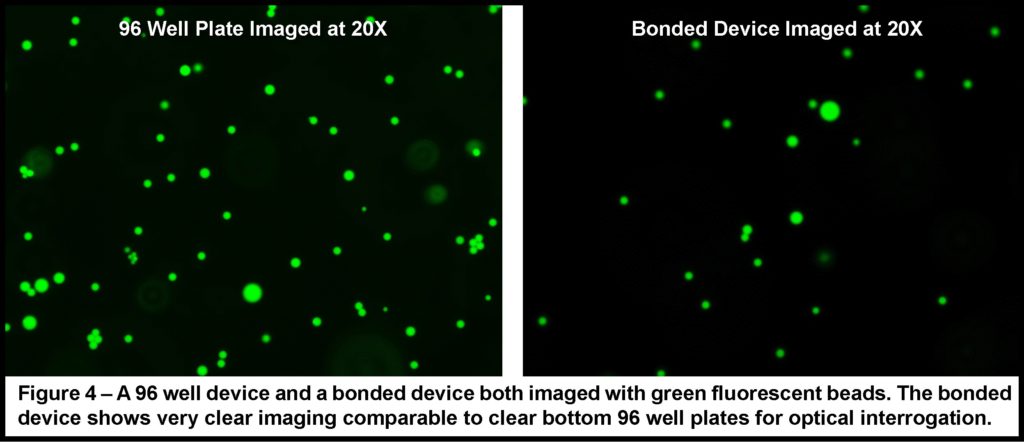
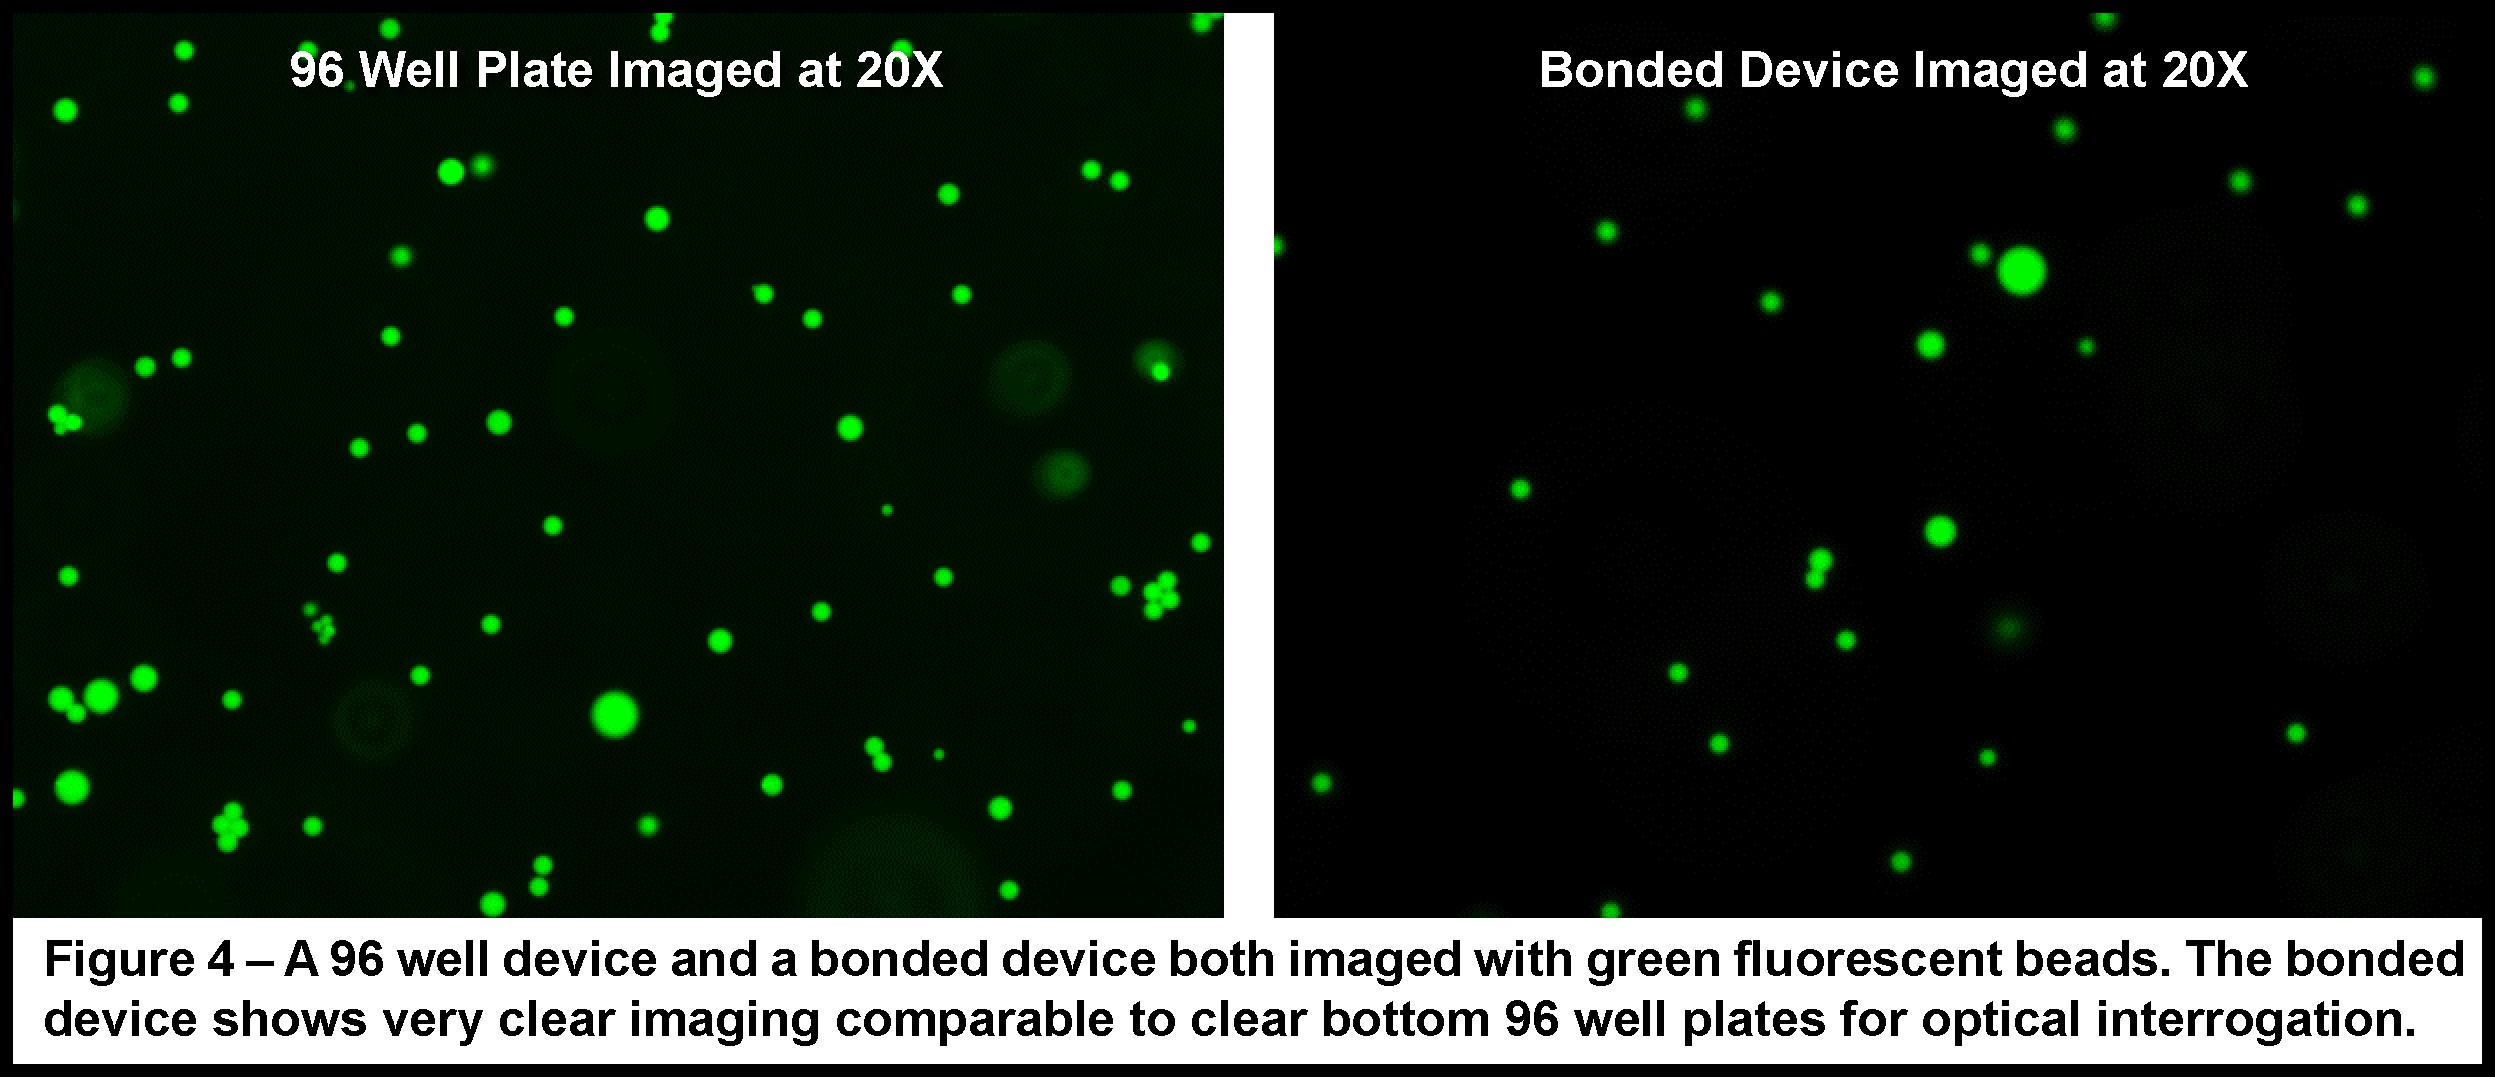
- Once heat returns to near room temperature, release pressure and remove device (Note: This may be overnight). Once complete, the devices should be effectively bonded and show optically clear bottoms with no aberrations (see Fig.4).

What Else Should I Know?
Before running this protocol, check your heated laminator press for scratches or pitting that could imprint on your film. If there are any significant scratches, these might become imprinted on your film and cause uneven bonding later in the process. A steel stainless steel sheet with a polished finish can be added on top of the bottom plate using thermal paste.
UVO treatment of plastics will create an oxide layer on the surface, rendering it more hydrophilic. The generation of oxygen species on the surface of plastics will reach a plateau after about sixty minutes.3
Almost any thermoplastic material4 can be bonded to the same type of material using the rule-of-thumb of heat being 5 °C over glass temperature, however it is worth noting that identical materials will bond most effectively, for example cyclic olefin polymer (COC) bonds to COC material straightforwardly, whereas COC will not bond as well to dislike material such as polycarbonate.
Do not overexpose your film and device to UVO (>sixty min) as this may cause significant yellowing and irreversible changes to the chemical makeup of the acrylic. Apply UVO as directed in this protocol. Some yellowing may happen, but in our hands, this does not create any noticeable background shading or autofluorescence.
Make sure not to put too much pressure on the film and device during the bonding process to ensure that devices are not warped, deformed or cracked, use only the pressure recommended in this protocol.
Always allow the heat from the laminated press to return back to room temperature, do not try to remove the device from the press before returning to room temperature as this will potentially produce an incomplete bonding.
If the pressure required for this bond causes deformation of critical features, consider applying ethanol to reduce surface glass temperature for a lighter pressure bond.5
While this publication discusses bonding to CNC-milled devices, there is potential for devices made from alternative fabrication techniques such as xurography or laser cutting to be bonded using a modified version of this protocol as well.6
Acknowledgements
We would like to acknowledge Chris Phaneuf, Ph.D. from Sandia National Laboratories as well as Edge Embossing (Charlestown, MA) for their assistance and expertise with helping us create this protocol. This work was funded by NIH/NCATS through an Interagency Agreement with MIT-Lincoln Laboratory as well as by NIH/NIBIB via grant award number 1R01EB025256-01A1.
| © 2022 Massachusetts Institute of Technology. |
| Delivered to the U.S. Government with Unlimited Rights, as defined in DFARS Part 252.227-7013 or 7014 (Feb 2014). Notwithstanding any copyright notice, U.S. Government rights in this work are defined by DFARS 252.227-7013 or DFARS 252.227-7014 as detailed above. Use of this work other than as specifically authorized by the U.S. Government may violate any copyrights that exist in this work. |
References
- Putting the Lid on Microfluidics [Internet]. Microfluidics. 2017 [cited 2022 Jan 7]. Available from: https://microfluidics.technicolor.com/wp-content/uploads/2021/12/Microfluidic-Chip-Bonding-Considerations-and-Case-Studies.pdf
- Bhattacharjee N, Urrios A, Kang S, Folch A. The upcoming 3D-printing revolution in microfluidics. Lab on a Chip. 2016;16(10):1720-42.
- Lin TY, Pfeiffer TT, Lillehoj PB. Stability of UV/ozone-treated thermoplastics under different storage conditions for microfluidic analytical devices. RSC advances. 2017;7(59):37374-9.
- Jiang J, Zhan J, Yue W, Yang M, Yi C, Li CW. A single low-cost microfabrication approach for polymethylmethacrylate, polystyrene, polycarbonate and polysulfone based microdevices. RSC Advances. 2015;5(45):36036-43.
- Harriet Riley, Development Editor. (2017, November 1). A solvent-based method to fabricate PMMA microfluidic devices – Chips and Tips. https://blogs.rsc.org/chipsandtips/2017/11/01/a-solvent-based-method-to-fabricate-pmma-microfluidic-devises/?doing_wp_cron=1625578271.8969628810882568359375 (Accessed November 2021)
- Burgoyne, F. (2010, May 17). Fast-iteration prototyping and bonding of complex plastic microfluidic devices – Chips and Tips. https://blogs.rsc.org/chipsandtips/2010/05/17/fast-iteration-prototyping-and-bonding-of-complex-plastic-microfluidic-devices/?doing_wp_cron=1625578517.8055989742279052734375 (Accessed November 2021)


")