Dmitry A. Markov,1,2 Elizabeth M. Lillie,1,2 Philip C. Samson,2,3 John P. Wikswo,1,2,3,4 Lisa J. McCawley2,5
1 Department of Biomedical Engineering, Vanderbilt University, Nashville, TN
2 Vanderbilt Institute for Integrative Biosystems Research and Education (VIIBRE), Vanderbilt University, Nashville, TN
3 Department of Physics and Astronomy, Vanderbilt University, Nashville, TN
4 Department of Molecular Physiology and Biophysics, Vanderbilt University Medical Center, Nashville, TN
5 Department of Cancer Biology, Vanderbilt University Medical Center, Nashville, TN
Why is this useful?
Allows for sterile sample collection during long-term slow perfusion experiments. Current developments in microfluidic devices and their applications in biology during long-term cell and tissue culture have introduced additional challenges associated with periodic sterile collections of effluent for storage and further analysis. Pumps (either mechanical or electroosmotic) and gravity-fed systems work well for delivering media at very slow flow rates (< 1 µL/min). However, sample collection at these rates becomes a non-trivial task, especially when one-, two-, or three-week-long experiments are required. For example, it would take 24 hours to collect 1 mL of effluent at a flow of 0.7µL/min. Two important parameters to consider are sample evaporation during the collection step and sterility maintenance during multiple periodic collections. These are especially critical for the gravity-fed systems where the output port of the cell culture device has to be opened to the atmospheric pressure. To overcome these challenges, we have tested use of Breathe-Easy gas permeable adhesive membranes from Electron Microscopy Sciences (cat. # 70536-10) as aseptic filters on top of sample collection vials. These membranes are inexpensive, easy to use, and gas permeable, allowing for unimpeded fluid flow into the sample collection reservoir, while maintaining sterility of the whole system during sample collection. During our three-week-long cell culture experiments, we were able to perform multiple 24-hour effluent collections from our bioreactor with a 5-day period while maintaining sterility of the whole system. Upchurch valves were used to switch the flow between the waste reservoir (4 days) and the sample collection vials (1 day). The evaporation was reduced by keeping the complete system at 100% humidity within a CO2 cell culture incubator.
What do I need?
- 1.5 mL microcentrifuge tube
- Butane torch or Bunsen burner
- Small 25 gauge heated needle for puncturing
- Short piece of small 23 gauge stainless steel tubing to be inserted into the microcentrifuge tube
- 90 second epoxy (Araldite 2043 or similar)
- Small bore Tygon tubing (OD = 1/16th “, ID=0.020”)
- Drill bit #53
- Breathe-Easy membrane (Electron Microscopy Sciences, cat. # 70536-10)
How do I do it?
Tube insertion using stainless steel interface connector:
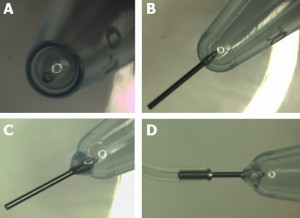
- Heat the puncturing needle with a cigarette lighter, Bunsen burner, or a small butane torch and carefully make a hole at the bottom of the microcentrifuge tube.
- Use a 4-6 mm long piece of small gauge stainless steel interface tubing, and insert it into the punctured hole. Outer diameter of this tubing should be larger by 1 or 2 gauges than the puncturing needle (23 ga. tubing has larger diameter than 25 ga. tubing). The fit should be snug.
- Apply a small bead of 90 second curing epoxy to affix the interface tube to the microcentrifuge tube.
- After the epoxy dries, feed tygon tubing onto the stainless steel interface tube.
- In our case, we used a 25 ga needle to create a hole and a 23 ga stainless steel tubing (OD=0.022″) as an interface between a 1.5 ml microcentrifuge tube and flexible Tygon tubing (OD=1/16th, ID=0.020″).
Alternative procedure for direct flexible tube insertion:
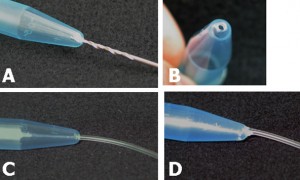
- Drill a small hole in the bottom of the microcentrifuge tube
- Insert the Tygon tube and apply 90 second epoxy to glue the two parts together.
- We used a #53 drill bit (Ø = 0.0595″) for 1/16th OD tygon tubing.
To apply the filter:
The following procedure should be performed wearing gloves and under aseptic conditions. Biosafety cabinets or laminar flow hoods with proper filtration are adequate. The Breathe-Easy membranes typically come sterile from the supplier and should be opened inside the biosafety hood and handled with sterile tweezers. The modified microcentrifuge tube with attached Tygon tubing can be sterilized using common procedures involving autoclave, alcohol, or gamma radiation sterilization (gas sterilization was not tested). All mentioned approaches performed reasonably well and were quite adequate; however, we have found that multiple autoclave sterilization cycles often softened the epoxied connections and alcohol sterilization required excessive handling of the components. In our opinion, gamma ray sterilization was found to be the easiest, simplest, and the most convenient approach.
- Start with sterile membrane and microcentrifuge tube with proper tubing attached.
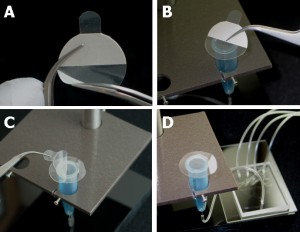
- Cut off the snap lid of the microcentrifuge tube.
- Peel one half of the protective film from one side of Breathe-Easy filter and attach exposed adhesive side of filter to the top rim of the tube.
- Then, remove the second half of the protective film and fully attach filter (make certain the seal is good around the perimeter with firm pressure applied with flat edge of forceps).
- When ready to use the assembly, carefully remove the top protective layer.
We used this method to periodically sample effluent from our bioreactor cartridges during long term cell culture. Each cartridge contains 4 reactors that are connected to a single manifold shown in Figure 4D.
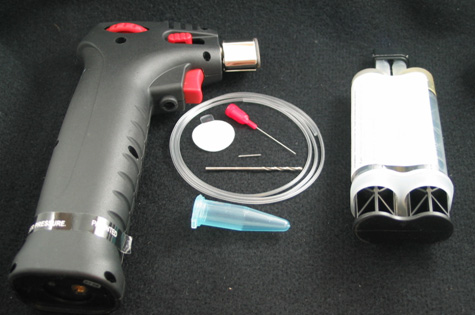
Figure 1. Tools and supplies needed
Figure 2. Preparing the microcentrifuge tube – Method 1. A) Hole punched with a hot needle. B) A piece of stainless steel needle inserted into the punctured hole. C) Inserted tube fixed in place with a 90 second epoxy. D) Flexible Tygon tubing attached to the interface tube.
Figure 3. Preparing the microcentrifuge tube – Method 2. A) Hole being drilled at the bottom. B) View of the drilled hole. C) Insertion of the small diameter Tygon tubing. D) Application of the 90 second epoxy to fix the inserted tube in place.
Figure 4. Preparation of the sterile cover. A) Protective plastic is removed from the adhesive side of the filter. B) Filter membrane is attached to the tube rim. C) Use caution to remove top protective plastic from the membrane attached to the tube. D) View of the tube with the filter mounted in the sample holder and attached to the collection network.
Acknowledgements
We would like to acknowledge support provided by the following grants: NIH/NCI R21 CA126728-01A1 and DOD/BCRP W81XWH-09-1-0444.


