Minkyu Kima, Guanya Shib, Ming Panc, Lucas R. Blaucha, and Sindy K.Y. Tanga*
aDepartment of Mechanical Engineering, Stanford University, Stanford, CA 94305, USA
bUndergradute Visiting Research Program, School of Engineering, Stanford University, Stanford, CA 94305, USA
cDepartment of Materials Science and Engineering, Stanford University, Stanford, CA 94305, USA
Why Is This Useful?
Many processes in biological and chemical preparation require centrifugation steps. The transfer of samples between the original sample container and tubes required by commercial centrifuges increases the risk of sample contamination, and often leads to the loss of samples. Commercial centrifuges are also not readily available outside laboratory settings. Here we show the design of a simple 3D-printed holder for attaching to the chuck of an electric drill/driver which we use as a centrifuge. The advantages of this method include: 1) The holder can be designed to hold non-conventional containers (e.g., syringes, glass vials, capillaries). 2) Electric drill/drivers are more widely available than centrifuges. We show that a variety of samples (e.g., water-in-oil emulsions, cell suspensions, food and drinks, wet soil) in various containers can be centrifuged with our method. This method should be useful for field work outside of the laboratory, and for the wider DIY community interested in home-based applications that require centrifugation, such as blood separation and related diagnostics, separation of interstitial water from wet soil for pollution detection, extraction and identification of allergens in food samples, and fluid clarification (e.g., olive oil, wine) by accelerating sedimentation.
What do I need?
- Electric drill/driver (DeWalt DC742KA Cordless Compact Drill/Driver Kit [1]).
- 3D-printed custom holder.
- 3D-printed custom support for the drill/driver.
- Four 1 mL-syringes (NORM-JECT, Part No.: 4010-200V0) as an example of non-conventional sample containers.
- One long bolt (Pan Head Machine Screw, Zinc, #8 x 1-1/4”) and one matching nut (Hex Nut, Zinc, #8-32). The dimensions of the bolt should match the chuck of the drill/driver.
- Four short bolts (Pan Head Machine Screw, Zinc, #6 x 1/2”) to secure the 1 mL-syringes to the 3D-printed custom holder.
What do I do?
- Design a custom holder using Solidworks or other CAD software.
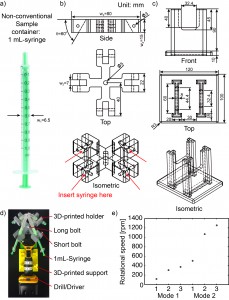
- Measure the outer diameter (w1 = 6.5 mm) of the 1 mL-syringe (Fig. 2a). We included a 0.5 mm-tolerance in deciding the width of the slot (w2 = 7 mm) into which the 1 mL-syringe will be secured (Fig. 2b).
- Decide the angle (q = 60°) at which the 1 mL-syringe will be tilted relative to the plane of rotation.
- Decide the length (w3 = 80 mm) and the thickness (w4 = 15 mm) of the holder.
- Measure or identify the outer diameters of the short and long bolts, and use these values for f3 and f5 respectively.
- Design a custom support for the drill/driver (Fig. 2c). The dimensions of this support are not critical so long as the drill/driver is stable and does not topple during operation.
- 3D-print the holder and the support. We used a 3D-printer by ROBO 3D [2]. The resolution of the 3D-printer in xyz direction is 100 mm. The material we used was polylactic acid (PLA).
- Assemble the centrifuge (Fig. 2d).
- Put one long bolt through the center of the holder and tighten with the nut.
- Insert the bolt into the chuck of the drill/driver and tighten the bolt by pushing the trigger of the drill/driver a few times.
- Make sure the bolt is fixed in the chuck and aligned to the drill/driver.
- Place the drill/driver in the 3D-printed support.
- Secure four 1 mL-syringes to the holder using the four short bolts.
- Start the centrifuge by pushing the trigger of the drill/driver for 5-10 minutes. The plane of rotation should be parallel to the floor.
- Unscrew the short bolts to remove the syringes.
- If desired, measure the rotational speed of the drill/driver before inserting the real samples. We used the SLO-MO mode in iPhone to calibrate the rotational speed of the drill/driver [3] (Fig. 2e).
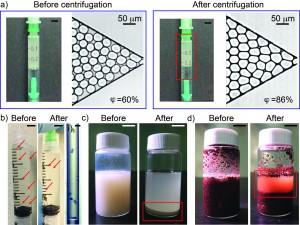
- Results (Fig. 3).
- Water-in-oil emulsion: Micron-sized uniform water-in-oil droplets were collected in a 1 mL-syringe. After a needle was connected to the syringe, the syringe was secured to the 3D-printed holder with needle pointing up. The holder was balanced before centrifugation by adding another syringe containing an equal weight of fluids to the opposite side of the holder. We centrifuged the sample at a speed of 374 rpm for 10 minutes. Droplets were then injected into a microchannel to measure the change of volume fraction before and after centrifugation. The volume fraction was defined as the ratio of the total volume of water droplets to the total volume of fluids filling up the channel. After centrifugation, the volume fraction of the emulsion increased from 60% to 86% without a change in the size of the droplets. Neither break-up nor coalescence of the droplets was observed.
- Stentor coeruleus: To demonstrate the concentration of cell suspensions, we used Stentor coeruleus (www.carolina.com) as a model. We filled a 3 mL-syringe with about 20 Stentor cells suspended in 2 mL of aqueous culture media (concentration ~ 10 cells/mL). A needle was connected to the syringe which was then secured in the 3D-printed holder with the needle pointing down. The cell suspension was centrifuged at a speed of 374 rpm for 5 min. The cells were concentrated at the bottom, close to the entrance into the needle. It was then possible to inject this concentrated cell suspension through the needle into a polyethylene tubing. Fig. 2-i) shows the microscopic image of the cells in about 15 mL of aqueous culture media in the tubing (concentration ~ 400 cells/mL).
- Korean rice wine (Makgeolli): A separate holder was designed to hold a 20 mL-glass vial. The vial was filled with 12 mL of Korean rice wine and centrifuged at a speed of 1252 rpm for 10 minutes. The sediment was clearly observed after centrifugation. On the other hand, the sediment was not observed for more than 20 minutes without centrifugation.
- Wet soil: 10 mL of wet soil in a 20 mL-glass vial was centrifuged at a speed of 1252 rpm for 10 minutes. Interstitial water was separated from the soil.
Figure 2. a) A 1-mL syringe as non-conventional container. b) Drawing of 3D-printed holder generated by SolidWorks. c) Drawing of 3D-printed support generated by SolidWorks. d) Photograph of experimental setup. The 3D-printed holder was connected to the drill/driver placed on the 3D-printed support. Four 1 mL-syringes were then tightened using the short bolts. e) Calibration plot of the rotational speed versus the trigger levels on different modes of the drill/driver. Mode 1 and Mode 2 indicate different gear settings in the transmission of the drill/driver. The numbers 1 to 3 in each mode indicate user-defined trigger levels. The rotational speed ranges from 120 rpm to 1252 rpm. The rotational speeds were measured using SLO-MO function in iPhone 6.
Figure 3. a) Photographs of emulsion in 1 mL-syringe and microscopic images of emulsion injected into a microchannel before and after centrifugation. The scale bar in the photographs is 5 mm. b) Photographs of Stentor cells in 3 mL-syringe before and after centrifugation. The red arrows indicate individual cells. The scale bar is 5 mm. i) Microscopic image of 6 Stentor cells in a polyethylene tubing after centrifugation. The scale bar is 300 mm. c) Photographs of Korean rice wine in 20 mL-glass vial before and after centrifugation. The red box indicates sediments. The scale bar is 10 mm. d) Photographs of wet soil in 20 mL-glass vial before and after centrifugation. The red box shows interstitial water separated from wet soil. The scale bar is 10 mm.
What else should i know?
- The centrifugal force can be increased by lengthening the arms (w3) holding the containers.
- The rotational speed can be measured using a high-speed camera or a smart phone with slow-motion videotaping capability, so long the frame rate is sufficient for the rotational speed used.
- The load in the centrifuge should be balanced.
- For safety purposes, safety goggles should be worn. The centrifuge should also be placed inside a safety barrier (e.g., a sturdy laundry basket). The safety instructions for the drill/driver should also be observed.
- After centrifugation for 10 minutes, we found that the drill/driver started to heat up. If centrifugation time longer than 10 minutes is needed, it should be possible to perform multiple rounds of 10-min centrifugation steps with breaks in between to cool down the drill/driver.
Conclusion
In this work, we demonstrated that 3D-printed holders attached to an electric drill/driver can be used for the centrifugation of samples in non-conventional containers. As 3D-printers and hand drills are easily accessible, we expect this tip to find immediate use in settings outside laboratories for field work, and also at home for DIY users.
Acknowledgements
We acknowledge support from the Stanford Woods Institute for the Environment and the National Science Foundation (Award #1454542 and #1517089).
References
1. http://www.dewalt.com/products/power-tools/drills/drills-and-hammer-drills/12v–38-10mm-cordless-compact-drilldriver-kit/dc742ka
2. http://store.robo3d.com/collections/all/products/r1-plus-3d-printer?variant=6274616835
3. http://www.imore.com/how-to-record-video-iphone-ipad


