David T. Eddington
Department of Bioengineering, University of Illinois at Chicago, Chicago, IL
Why is this useful?
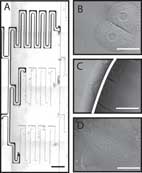
During long-term perfusion of microfluidic channels, bubbles sometimes enter and occlude the channel network as shown in Figure 1A. In addition, bubbles are cytotoxic to mammalian cells as the surface tension of the air-liquid interface within a microfluidic channel is large enough to rupture cell membranes as shown in Figures 1B-D. Even when care is taken to fill microfluidic networks and connect tubing without introducing bubbles (see the Tip “Avoiding bubble injection by droplet merging” by Young et al.), bubbles sometimes nucleate within the tubing and enter the channel network causing experiments to fail. Traditional bubble traps are ineffective for microfluidic systems as these require tubing to connect the bubble trap to the microfluidic device which introduces more opportunities for bubbles to enter the channel network. To reduce this problem an in-line microfluidic bubble trap has been developed that can be easily integrated into many microfluidic designs.
What do I need?
- SU-8 mold master
- PDMS (Sylgard 184, Dow Corning)
- Razor blade
- 5mm diameter x 5mm cylindrical spacer (can be adjusted depending on device design)
What do I do?
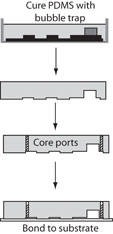
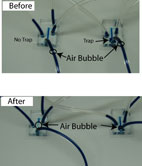
The fabrication of the microfluidic bubble trap is achieved by either molding a well within the network (Figure 2) or by cutting out a well after curing (Figure 3). If a design is still being iterated, it is easier to cut out the bubble trap after curing. However, if a final design has been reached, then molding the bubble trap into the network is ideal. After the bubble trap is cut out or molded, the device is simply bonded to a substrate and when bubbles are introduced into the network they will enter the in-line bubble trap and float to the top as shown in Figure 4. The volume of the bubble trap can be adjusted depending on the length of the experiments.
Iterated Design (Figure 2)
1. Cure PDMS on master.
2. After peeling the PDMS mold from the master, use the razor blade to cut out a bubble trap. The trap should be deep enough to allow the bubble to rise out of the microchannel.
3. Core access ports through the PDMS mold.
4. Assemble device.
Final Design (Figure 3)
1. Place stainless steel spacers on the master where bubble traps are desired.
2. Pour PDMS over master and cure.
3. After peeling the PDMS mold from the master, remove the steel spacer. The spacer may need to be cut out of the mold with the razor blade.
4. Core access ports through the PDMS mold.
5. Assemble device.
Figure 4
References
E. W. K. Young, A. R. Wheeler and C. A. Simmons, Avoiding bubble injection by droplet merging, Chips & Tips (Lab on a Chip), 23 October 2006.


