Author Archive

A solvent-based method to fabricate PMMA microfluidic devices

Mustafa Al-Adhami; Abhay Andar; Elizabeth Tan; Govind Rao; Yordan Kostov*

Center for Advanced Sensor Technology, University of Maryland, Baltimore County, 1000 Hilltop Circle, TRC 252, Baltimore, Maryland, 21250.

*Email: kostov@umbc.edu

Why is this useful?

The demand for microfluidics has steadily increased, due in part to the growing popularity of point-of-care devices [1].  Often, microfluidic chips are fabricated in thermoplastics [1]. Thermoplastics are synthetic polymers that have gained popularity due to their ability to be molded into complex structures [3, 4]. They are often used as a safer and cheaper alternative to glass [3, 4]. However, proper sealing of these devices proves challenging, especially in the field of medical testing, where the demand for reliable devices is high. For example, pressure-sensitive adhesives, common sealants, can limit the size of microfluidic channels; some adhesive can exhibit reactive groups that interfere with analytical processes that run on the chip [5]. Hence, a method of sealing that is free from the aforementioned limitations is needed.

Here, a solvent-based method is presented. Polymethylmethacrylate (PMMA), a thermoplastic, exhibits softening at temperatures above its glass transition temperature (Tg) returning to its original state when cooled. This transition introduces several direct bonding options [6]. However, Tg of PMMA is 115 °C. The pressure required for bonding even at this temperature is fairly high. This can lead to imperfections in the channel dimensions, as the bulk of the material softens. The application of a weak solvent decreases Tg only for the surface of the plastic, thus reducing the required temperature and pressure for the process. The decreased pressure reduces the possibility of channel deformation. Furthermore, as the solvent-induced softening is limited only to the surface (the first few microns), the deeper channel structures are not affected. Hence, a direct solvent bonding method allows for an adhesive-free bonding and avoids a temperature-induced deformation. As a bonus, the mechanical properties of the bond are greatly enhanced [7]. It is worth noting that this approach is valid for microfluidic devices with channel depths greater than 100 microns, typically for devices produced by a direct laser etching.

Another advantage of this technique is that it results in the production of sterile devices when the weak solvent is ethanol. They can be manufactured quickly using basic equipment found in any laboratory [7]. To demonstrate this method, PMMA was used along with 90% ethanol as a solvent to bond to other sheet materials such as:

  • PMMA sheets,, to manufacture microfluidic mixers and other microfluidic devices for sample processing (Figure 1, a, d) [7];
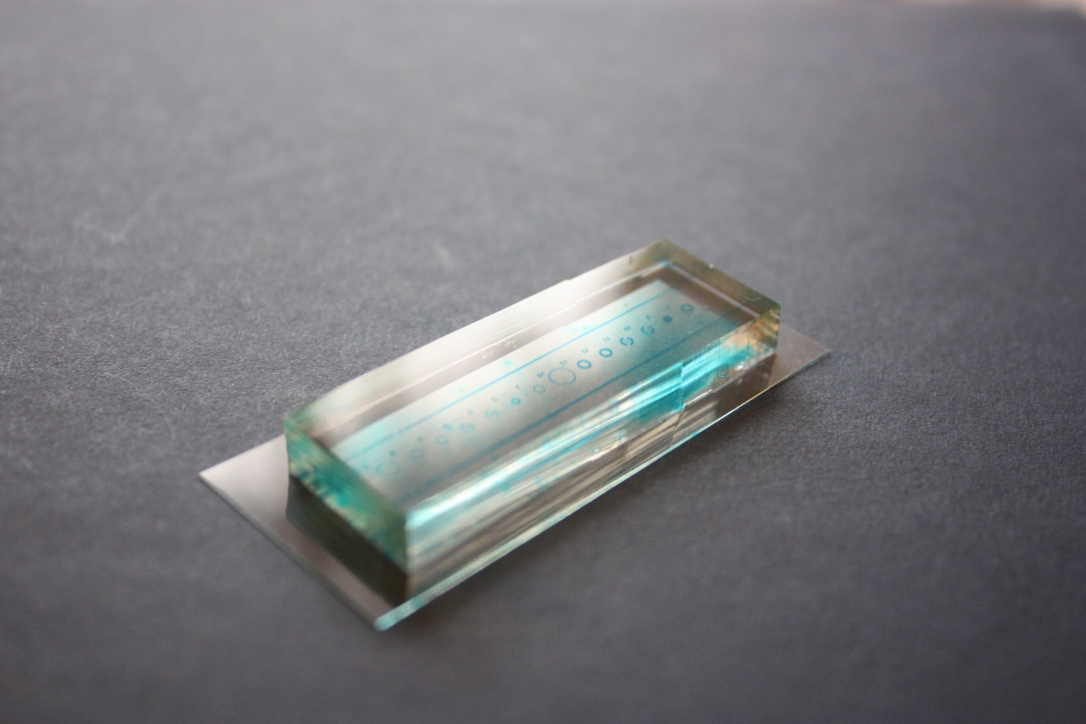
  • ePTFE membranes, to make microfluidic de-bubblers (Figure 1, c); and,
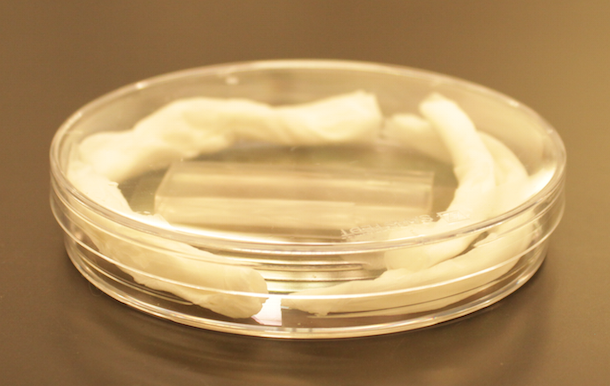
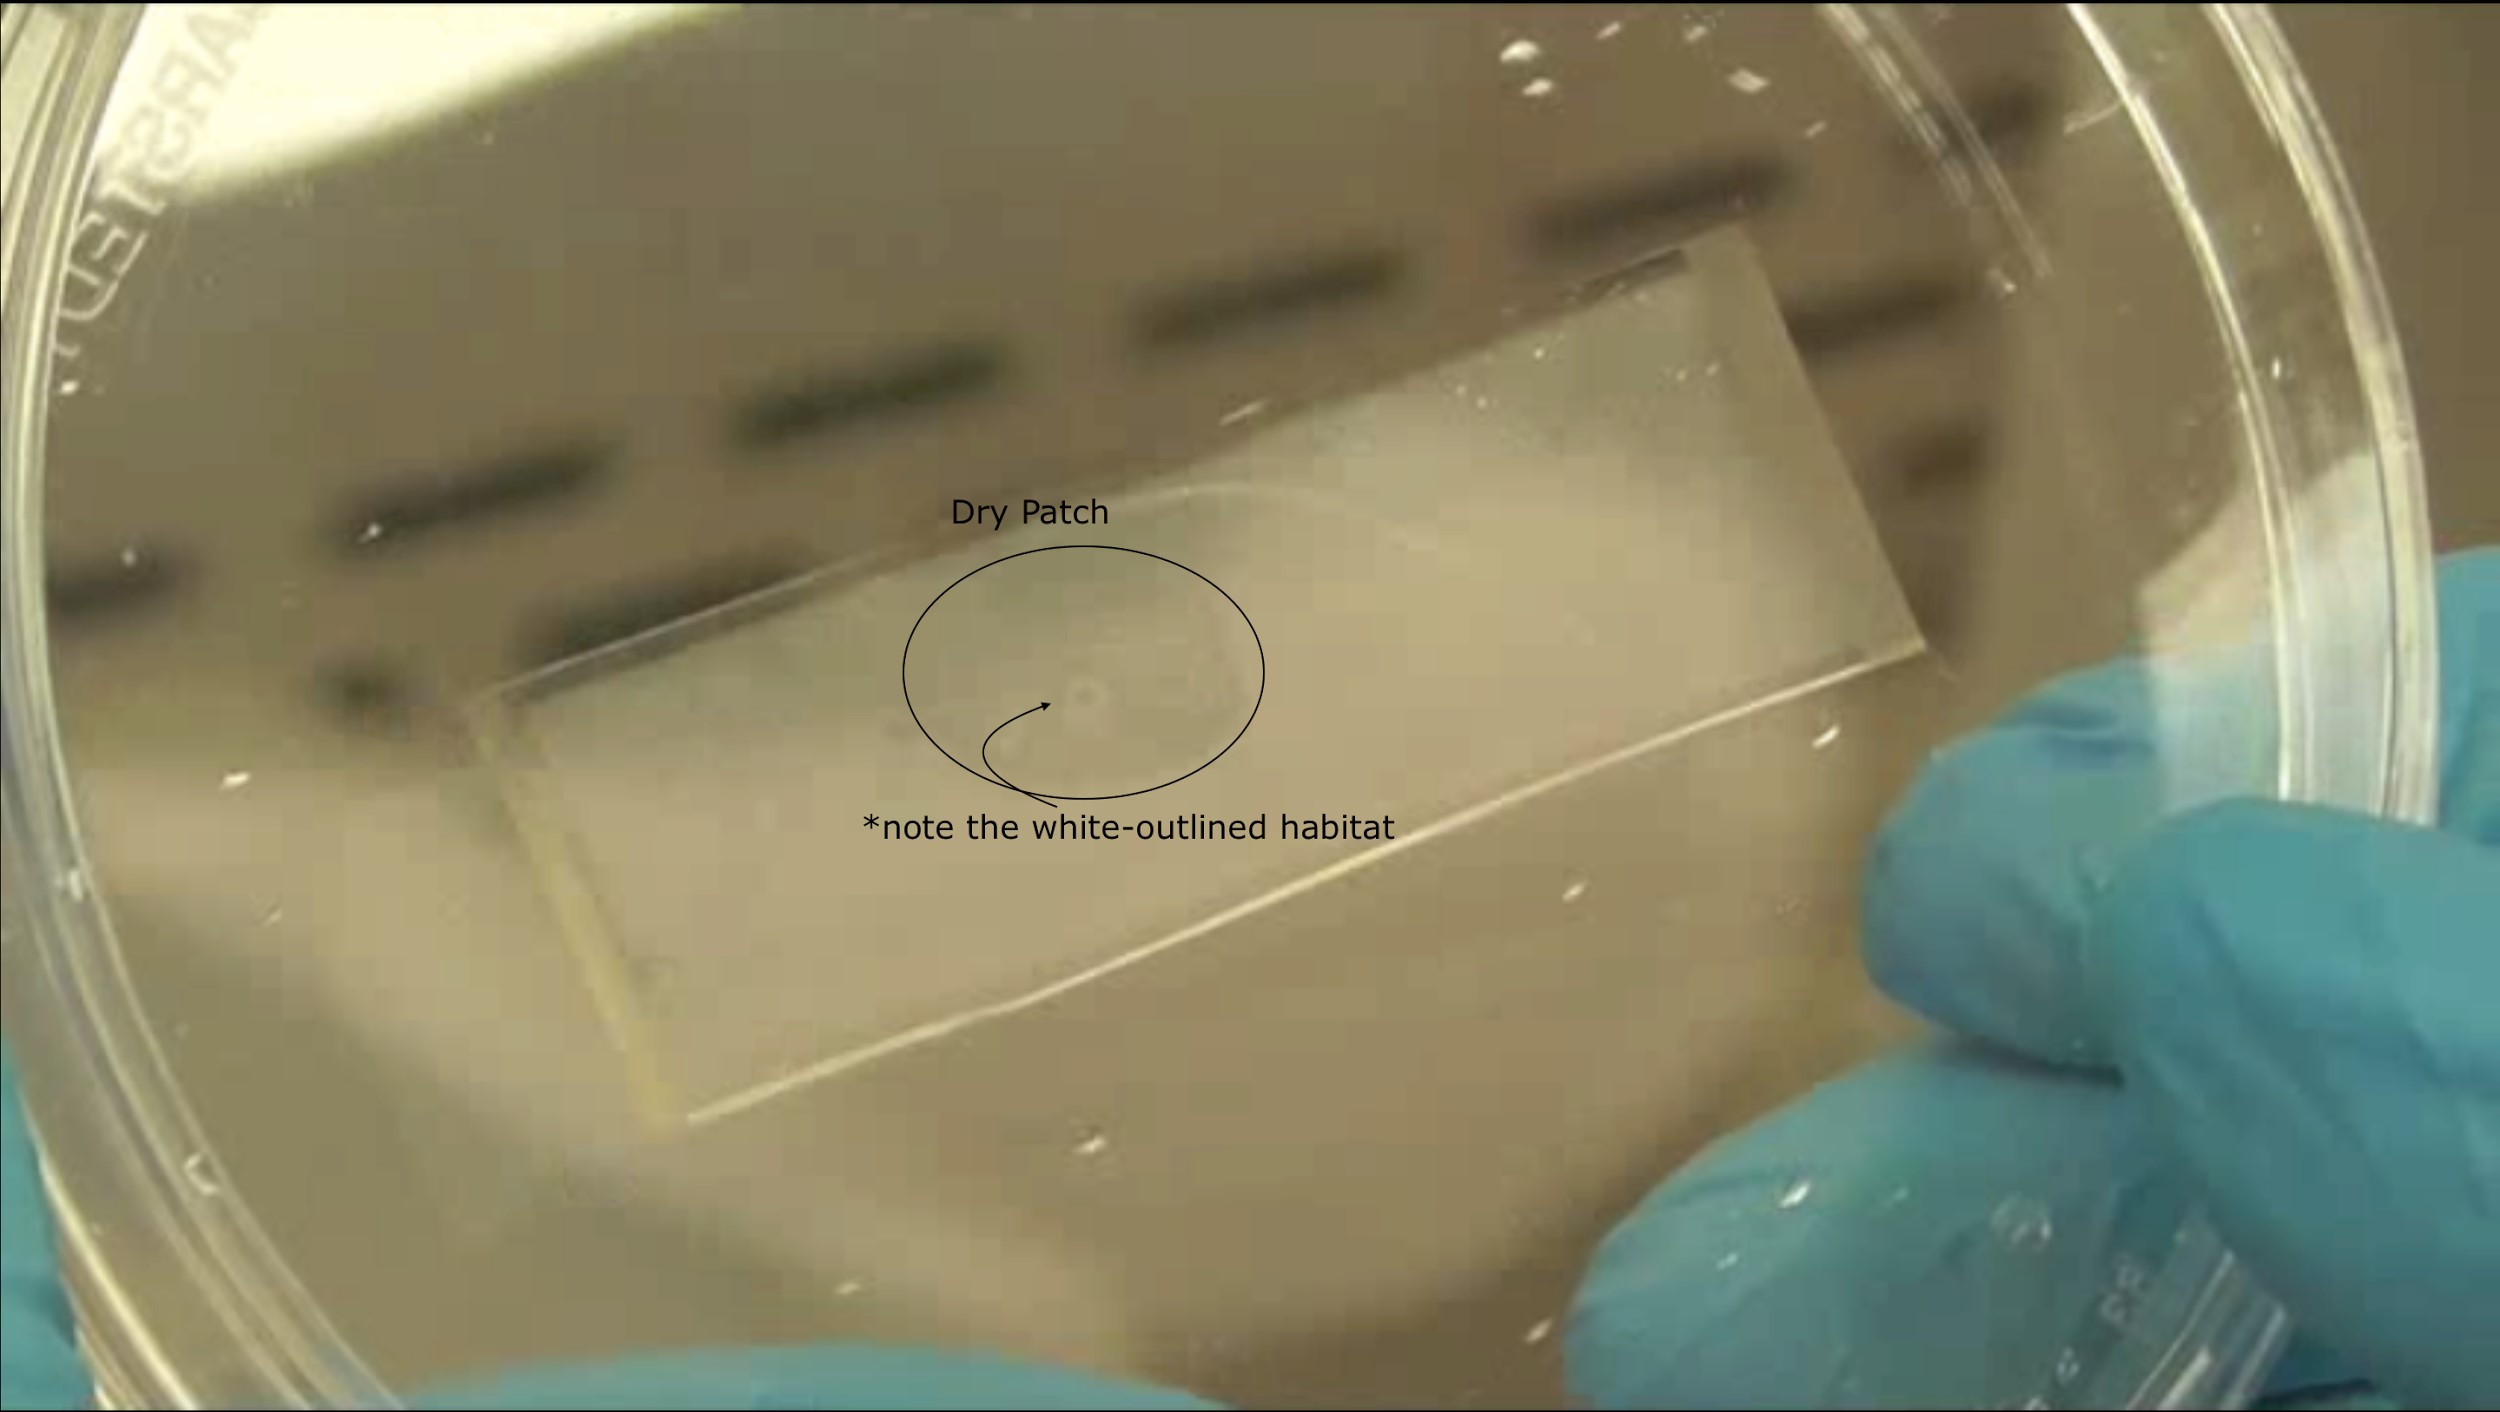
  • Cellulose Acetate membranes, to make custom made dialysis devices (Figure 1, b).

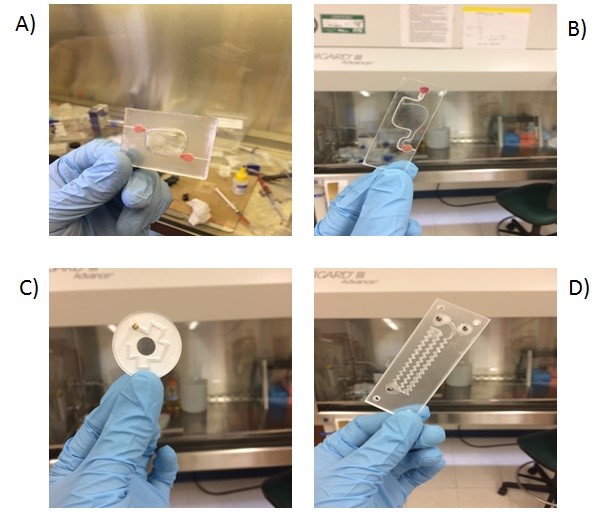
Figure 1. A) Dialysis device B) Redox assay enclosure C) Microfluidic debubbler D) Microfluidic mixer

What do I need?

Materials:

  • PMMA sheet, thickness of 1.5 mm (Astra Products)
  • PMMA sheet, thickness of 0.2 mm (Astra Products)
  • 10K, 20K MWCO Cellulose Acetate membranes (Thermo Fisher Scientific)
  • ePTFE membrane (Sterlitech,product number: PTU021350)
  • Metal vise (McMaster, product number: 5226A3)
  • 1000 grit Sandpaper (McMaster)
  • Silicone pad (McMaster)
  • KIM-WIPES (Kimberley Clark)
  • 2 rectangular metal sheets (McMaster)
  • Deionized water
  • 90% Ethanol (Decon Labratories, Fisher Scientific, Reagent grade)

Equipment:

  • CO2 Laser cutter (Universal laser systems)
  • Conventional toaster oven
  • Computer aided design (CAD) software (CorelDRAW X4)
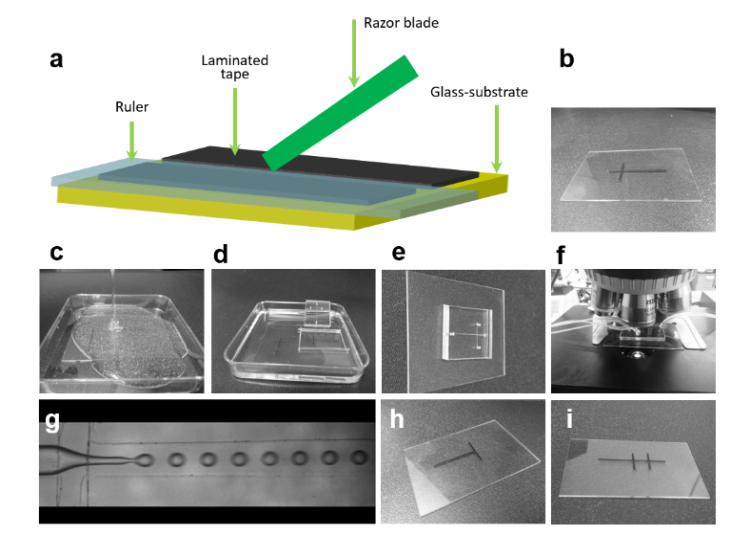
What do I do?

  1. Design devise
    1. Draw the desired devise design using any available computer aided design (CAD) software.
    2. Export the CAD file into .dxf file format that is compatible with the laser cutter software.
  2. Laser cut design
    1. Place the PMMA sheet of 1.5 mm in thickness onto the bed of the laser cutter.
    2. Calibrate laser cutter according to sheet thickness.
    3. Select the correct laser setting in the laser cutter software. It should be height-aligned according to the material and thickness of the sheet.
    4. Laser cut the core pathway of the design onto the 1.5 mm thickness of PMMA.
    5. Next, place the other PMMA sheet of 0.2 mm in thickness onto the bed of the laser cutter and repeat points b-c
  3. Roughen the PMMA sheets
    1. After laser cutting, there should be a total of three pieces: core channel design (1) and cover sheets (2).
    2. Rinse the PMMA cutouts with deionized water and wet the sandpaper with tap water.
    3. Sand the wetted PMMA cutouts in a figure eight-like motion onto the wetted sandpaper until it is milky white. This is to ensure flat conformity on the PMMA sheets to increase bondage.
    4. Rinse PMMA cutouts with deionized water and dry using “KIM WIPES”.
  4. Bond the PMMA sheets
    1. Preheat the temperature-controlled oven to 55 °C. Place the metal vise and the rectangular metal sheets in the oven to preheat as well. Thermal gloves should be used for safety.
    2. Place a clean sheet of silicone onto a rectangular metal (aluminum) plate.
    3. Next, place the base cover of the microfluidic cassette on top of the silicone pad in a sandwich manner.
    4. Spray the 90% ethanol to the base cover sheet until all area is wetted.
    5. Place the core channel sheet of the PMMA cutout.
    6. Spray the 90% ethanol to the core channel sheet until the complete area, to be bonded, is wetted.
    7. Place the final cover sheet of the microfluidic cassette.
    8. Place the other silicone pad and the other rectangular metal sheet following it.
    9. Place the sandwiched PMMA sheet, silicone pad, and rectangular metal sheet in the metal vise carefully so it does not misalign the cassette (Figure 2.)
    10. Tighten the vise until can’t turn the lever anymore.
    11. Place the vise with the microfluidic cassette sandwich into the preheated oven for five minutes. This has to happen before the vise is cooled down.
    12. Allow to cool to room temperature and remove from metal vise and silicone pad.
    13. Add inlet and outlet fittings, either glue them on or place them depending on the method of preference
  5. Bonding PMMA to ePTFE(or cellulose acetate):
    1. Preheat the temperature-controlled oven to 85°C. Place the metal vise and the rectangular metal sheets in the oven to preheat as well. Thermal gloves should be used for safety.
    2. Place a clean sheet of silicone onto a rectangular metal (aluminum) plate.
    3. Next, place the membrane of the microfluidic cassette on top of the silicone pad in a sandwich manner.
    4. Spray the 90% ethanol on the membrane sheet until all area is wetted.
    5. Place the core channel sheet of the PMMA cutout.
    6. Spray the 90% ethanol to the core channel sheet until the complete area, to be bonded, is wetted.
    7. Place the final PMMA cover sheet of the microfluidic cassette.
    8. Place the other silicone pad and the other rectangular metal sheet following it.
    9. Place the sandwiched device, silicone pad, and rectangular metal sheet in the metal vise carefully so it does not misalign the cassette (Figure 2.)

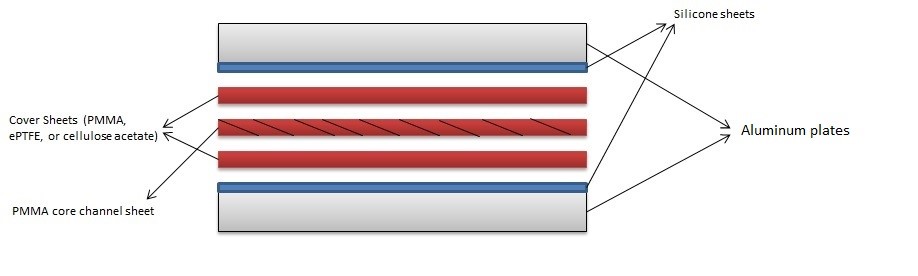
      Figure 2. Bonding setup

    10. Tighten the vise until can’t turn the lever anymore.
    11. Place the vise with the microfluidic cassette sandwich into the preheated oven for five minutes. This has to happen before the vise is cooled down.
    12. Allow to cool to room temperature and remove from metal vise and silicone pad and remove the excess membrane if any with scissors.
    13. Add inlet and outlet fittings, either glue them on or place them depending on the method of preference

What else do I need to know?

In order to align the sheets on top of each other, three methods were used:

  1. For PMMA-PMMA devices it is enough to eyeball the alignment. The adhesion forces between the PMMA sheets with ethanol in between are enough to keep them fixed in place.
  2. An alignment manifold was also fabricated where the machined sheets are placed in. The manifold will prevent the movement of the sheets (Figure 3a.).
  3. Where the membrane is thick enough to drill a hole through, it is better to use three alignment pins. The pin holes are pre-fabricated when the device is machines. Toothpicks have been used as alignment pins (Figure 3b.).

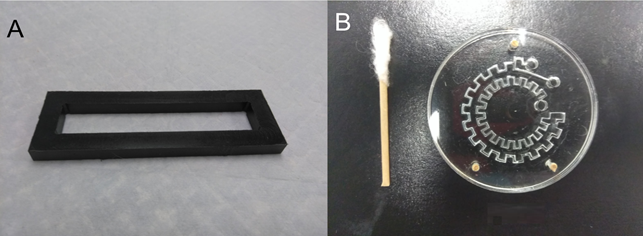
    Figure 3. A) Alignment manifold B) 3 wooden pins are used to keep the layers from moving

  4. For thinner membranes, the machined PMMA is bonded on a slightly bigger membrane. The excess membrane is then removed with scissors.

Acknowledgements

This work was funded by DARPA, Biologically-derived Medicines on Demand (Bio-Mod) Project Grant (N66001-13-C-4023) for financial support.

References

  • Sia, S. K., & Kricka, L. J. (2008). Microfluidics and point-of-care testing. Lab on a Chip8(12), 1982. doi:10.1039/b817915h
  • Materials Used in Microfluidic Devices. (n.d.). SpringerReference. doi: 10.1007 /springerreference_67093
  • Liu, K., & Fan, Z. H. (2011). Thermoplastic microfluidic devices and their applications in protein and DNA analysis. The Analyst136(7), 1288. doi:10.1039/c0an00969
  • Tsao, C., & DeVoe, D. L. (2008). Bonding of thermoplastic polymer microfluidics. Microfluidics and Nanofluidics,6(1), 1-16.doi:10.1007/s10404-008-0361-x
  • Hong, T., Ju, W., Wu, M., Tai, C., Tsai, C., & Fu, L. (2010). Rapid prototyping of PMMA microfluidic chips utilizing a CO2 laser. Microfluidics and Nanofluidics9(6), 1125-1133. doi:10.1007/s10404-010-0633-0
  • Visakh, P. M., & Thomas, S. (2011). Engineering and Specialty Thermoplastics: Nylons: State of Art, New Challenges and Opportunities. Handbook of Engineering and Specialty Thermoplastics, 1-9. doi:10.1002/9781118229064.ch1
  • Al-Adhami, M., Tilahun, D., Gurramkonda, C., Rao, G., Kostov, Y (2016) Rapid detection of microbial contamination using a microfluidic devise. In: Biosensors and Biodetection: Methods and Protocols, Second Edition. Ed. A. Rasooly and B. Prickril. Springer.
Digg This
Reddit This
Stumble Now!
Share on Facebook
Bookmark this on Delicious
Share on LinkedIn
Bookmark this on Technorati
Post on Twitter
Google Buzz (aka. Google Reader)

Manual Razor Patterned Tape Based Prototyping for Droplet Microfluidics

Saifullah Loneab* I. W. Cheongb and S. T. Thoroddsena

aDivision of physical Sciences and Engineering, King Abdullah University of Science & Technology, (KAUST), Thuwal, 23955-6900, Saudi Arabia.
bInstitute of Advanced Energy Technology, Kyungpook National University, Daegu, South Korea,
Phone: +821053165673, Office: +82-53-950-7590, FAX: +82-53-950-6594. Email: saifullah.lone@gmail.com, inwoocheong@gmail.com, and sigurdur.thoroddsen@kaust.edu.sa

Why is it Useful?

The subject of droplet microfluidics has grown in importance among researchers in chemistry, physics and biology, hence it has found applications in drug delivery, encapsulation, single-cell analysis, pickering-emulsion and phase-separation. For generating monodisperse droplets, various methods have been employed in constructing microfluidic devices. Emulsions with a coefficient of variation ≤ 5% have been previously reported in T-junction, flow focusing, co-axial, as well as other types of microfluidic devices. Microdroplets with ≤100 µm size offer attractive applications in industry and biology.  Small channel-diameters attained by clean-room soft lithography is the most precise technique for fabricating microfluidic devices.1, 2 This technique is widely used to make master molds for PDMS-based devices.3 However, regarding the cost and complexity, it is difficult to install clean-room soft lithography in financially challenged countries and laboratories. Therefore, the cost and special clean-room training restricts its wide-spread application. To develop low cost robust technologies; inkjet printing, controlled numerical machining, xurography or razor-writing, printed circuit technology, print-and-peel (PAP) microfabrication and 3-D printing have been tested to fabricate microfluidic devices without clean-room technology.  However, creating droplets under 100 µm size ranges by non-cleanroom technologies is challenging and open for upgradation. Recently, a rapid prototyping technique for microfluidics has been reported by employing laser-patterned tape4 This technique relies on computer-controlled CO2 laser beam. This work was further simplified by manual razor patterned tape-based prototyping for patterning mammalian cells.5 Building on this prototyping concept, we extended the idea to produce monodisperse droplets under 100 µm size rages by overlapping the razor patterned tape strips (at right angles) on a flat glass surface. The production of monodisperse emulsion under 100 µm size ranges are greatly useful in pharmaceutical and cosmetic industries. Hence, our approach may well serve as one of the simplest approaches to fabricate droplet microfluidic generators.

What do I need?   

  1. One-sided adhesive tape (Temflex 1500 electrical, thickness 150 µm)
  2. Flat glass slides, such as a microscope slide
  3. 30cm stainless steel metal ruler 
  4. Sharp razor blade
  5. Uncured mixture of PDMS base and curing agent (10:1 w/w)
  6. Oxygen plasma
  7. Oven or hot plate
  8. A microfluidic PDMS puncher for drilling holes
  9. Deionized water (D.I. water) and 20 cSt and 10 cSt silicone oil

What do I do?

Figure 1 outlines the prototyping procedure. Prototyping begins by attaching adhesive tape on a flat glass substrate. With a sharp razor-blade, the tape is cut into fine parallel strips. The thickness of the tape (150 µm) determines the depth of the microchannel, but this can be increased by attaching multiple layers of tape on top of each other. Next the tape is removed from the regions outside the fine strips.

To construct a cross-junction, one strip of the tape is lifted and horizontally placed on top of another at an angle of 90ᴼ. The junction is pressed gently to ensure the strips are well attached. These adhering strips of tape serve as a master for PDMS-based replica casting.

A mixture of PDMS silicone elastomer base and a curing agent (in 10:1 ratio) is poured on top of the master within a plastic petri dish. The mixture is degassed under vacuum for 1 h and cured for 4 hrs at 65°C. Cured PDMS replica is then cut and peeled-off from the master. The master can be used repeatedly to fabricate multiple copies of the PDMS replica by following the afore-mentioned steps. Inlet and outlet holes are drilled through PDMS replica, which is then bonded on a glass substrate, after both replica and glass has been exposed to oxygen plasma.  Figure 1(g) shows the resulting PDMS-device for generating monodisperse water-in-oil (W/O) emulsion. The technique is easily extended to fabricate T-junction or double T-junction prototypes (Figure 1h and i).

Figure 1. (a) Manual Razor Patterned Tape Based Prototyping for Droplet Microfluidics (b) Strips of adhesive tape on flat glass-substrate cut by a sharp razor-blade and a ruler, (c) The PDMS-casting, by pouring a mixture of PDMS silicone elastomer base and curing agent on top of the master in a plastic container. (d) Cut and peeled-off replica after curing. (e) Final assembled cross-junction microfluidic PDMS device. (f) Microfluidic device connected to syringe pumps under an optical microscope. (g)  Video frame showing water-in-oil droplet formation in a flow-focusing prototype. Panels (h) and (i) show razor patterned tape-based T-junction and double T-junction prototypes, respectively.
Figure 2. (a) Image sequence from a video recorded at 10 kfps showing water droplet formation at a cross-junction.  Time between subsequent frames is 200 µs.  (b) Droplet size as a function of capillary number based on the viscosity and flow-rate of the continuous-phase (20 cSt silicone oil), for the channel in panels (c) for 300 µm wide channel above the horizontal line and (d) for 150 µm channel below the horizontal line with 10 cSt silicone oil.  (c) Images extracted from video, showing flow regimes and droplet sizes as a function of flow-rate, with 300 µm channel width and 150 µm channel depth. (d) Video frame from smaller square channel with 150 µm width and depth.

Figure 2(a), demonstrates the droplet formation at a cross junction in our tape-based microfluidic device, with a channel width and depth of 300 µm and 150 µm respectively. In Figure 2(c), we kept the flow rate of aqueous phase fixed at 25 µl/min, while systematically increasing the flow-rate of outer continuous oil-phase (20 cSt silicone oil).  As the outer flow-rate is increased, the regime is found to shift from dripping at lower flow-rate to jetting at higher flow-rate (Figure 2(c)).  For lowest flow-rate, the aqueous-phase breaks into elongated plugs, while at higher flow-rates regular drops are pinched off.  Various factors affect the size of the droplets, but it is primarily determined by competition between viscous stress in the continuous phase Fv~ µU/d which tends to rip off the drop and the interfacial tension Fs ~ s/d which try to keep the drop attached. Here µ is the dynamic viscosity of the outer phase and U is its velocity; while s  is the interfacial tension between the water and the oil, s=0.040 N/m.  For small channels, the characteristic length-scale d is the same for the two forces and it therefore drops out of the balance and when Fv~ Fs then the non-dimensional capillary number Ca=µU/s characterizes their relative strength.  Figure 2b shows the droplet-size as a function of Ca.  When the flow-rate of oil-phase reaches 65 µl/min, the size of the droplets reaches ~100 µm and the droplet breakup occurs at a large distance from the cross-junction. Figure 2(d) shows drop formation with a channel width of 150 µm and a channel depth of 150 µm. In this case, the droplet size reaches down to ~73 µm, when the oil-phase (10 cSt) is flowing at 25 µl/min and aqueous-phase at 10 µl/min.


Acknowledgement: This work was jointly funded by King Abdullah university of Science & Technology (KAUST), Thuwal, Saudi Arabia , and the Ministry of Trade, Industry and Energy, Korea (Grants No. 10067082 and 10070241).


Reference

[1] Qin, D.; Xia, Y.; Whitesides, G. M. Rapid prototyping of complex structures with feature sizes larger than 20 μm. Adv. Mater. 1996, 8, 917-919.

[2] Xia, Y.; Whitesides, G. M. Soft Lithography. Angew. Chem. Int. Ed. 1998, 37 550- 575.

[3] Duffy, D. C.; McDonald, J. C.; Schueller, O. J.; Whitesides, G. M. Rapid Prototyping of Microfluidic Systems in Poly (dimethyl siloxane). Anal. Chem., 199870, 4974–4984.

[4] Luo, L. W.; Teo, C. Y T.; Ong, W. L.; Tang, K. C.; Cheow, L. F.; Yobas, L. Rapid prototyping of microfluidic systems using a laser-patterned tape J. Micromech. Microeng. 2007, 17 N107–N111

[5] Anil, B. S.; Ali, H.; Cheul, H. C.; and Raquel, P-C. Adhesive-tape soft lithography for patterning mammalian cells: application to wound-healing assays. BioTechniques, 2012, 53 315–318.

Digg This
Reddit This
Stumble Now!
Share on Facebook
Bookmark this on Delicious
Share on LinkedIn
Bookmark this on Technorati
Post on Twitter
Google Buzz (aka. Google Reader)

Rapid Inoculation and Recovery of Microbes in a Microfluidic Device

Greiner, A.1,2, Tekwa, E.W.1,3, Gonzalez, A.1, Nguyen, D.4

1Department of Biology, McGill University, 1205 Dr. Penfield, Montreal, QC, H3A 1B1, Canada.
2Department of Ecology and Evolution, University of Toronto, 25 Willcocks Street, Toronto, ON, M5S 3B2, Canada
3Department of Ecology, Evolution, and Natural Resources, Rutgers University, 14 College Farm Road, New Brunswick, NJ, 08901, USA.
4Meakins Christie Laboratories, Research Institute of the McGill University Health Centre, and Department of Medicine, McGill University, 1001 Decarie Blvd, Montreal, QC, H4A 3J1, Canada.


Why is this useful?

Microfluidic devices are used for many different types of experiments across the medical, ecological and evolutionary disciplines (Park et al., 2003; Keymer et al., 2008; Connell et al., 2013; Hol & Dekker, 2014). For example, microfluidic devices for microbial experiments require inoculation into smaller chambers that simulate natural microbial environments such as porous soils (Or et al., 2007) and biological hosts (Folkesson et al., 2012). These devices often involve complicated pump setups and irreversible seals. We developed a technique that requires only common lab equipment and makes the device reusable while also allowing the microbes to grow undisturbed (based on Tekwa et al., 2015; Tekwa et al., in review). Here, we provide a detailed guide for the assembly and the previously undocumented non-destructive disassembly of polydimethylsiloxane (PDMS) experimental devices to recover microbes in situ, which can then be plated for relative counts and further molecular analyses of population changes. This is complemented by videos for each step.

Figure 1: Microfluidic device containing 14 habitats on an elastomer (PDMS) layer pressed onto a 60mm x 24mm glass cover slip. The habitats are 10 or 20µm in depth, range from 1400 µm to 2670 µm in diameter and take the shape of a ring or network of patches. This device is used to test the effects of habitat patchiness on microbe dynamics. Habitats were dyed blue for visualization. For more information see Tekwa et al. (2015).


What do I need?

  • Single-layer PDMS devices with habitats on one side
  • Pipette + sterile pipette tips
  • Sterile petri dishes (1/device)
  • Sterile tweezers
  • Inoculum
  • Filtered water
  • Kimwipes
  • Autoclavable plastic container
  • Ethanol
  • Tinfoil
  • Sterile 1μL inoculating loop (1/habitat)
  • Sterile eppendorfs
  • Phosphate-buffered saline (PBS)
  • Biological safety cabinet (BSC)

How do I do it?

  1. Clean the PDMS devices: The PDMS device should be pre-treated once with 0.01N HCl for one hour and plasma-treated to keep it hydrophilic and amenable to bonding to glass or plastic substrates (Cho et al., 2007; Tekwa et al., 2015). Fill autoclavable plastic container 1/3rd full of 70% ethanol and PDMS devices and then cover with tinfoil, let them sit in this for >30 minutes before carefully disposing of the ethanol down the sink. Fill and empty the container with water 10 times in order to rinse the devices. Lastly, fill the container with filtered water, seal with tin foil and autoclave in order to sterilize the devices.
  2. Inoculating the devices (perform in a Biological Safety Cabinet, BSC): Set the devices to dry in the BSC for 30 minutes. Place the devices with features facing up on the lid of a petri dish and place a small amount (i.e. 0.7 µL) of inoculum onto each (of 14 in sample device Fig. 1) habitat. The amount of liquid must be sufficient to fill the habitats, but not too much as to prevent bonding between PDMS and the cover glass/petri dish (Fig. 2). Using sterile tweezers, pick up the device and place face down into the centre of a petri dish or cover glass, sealing it to the surface by pushing on the back with gloved fingers repeatedly, using a kimwipe to wick excess liquid away from the side. Then surround, but not touch, the device with kimwipes soaked in filtered water (Fig. 3) to ensure that the device does not dry out in the incubator, before closing the petri dish. Place upright in incubator for the desired amount of time. The experiment can now proceed untouched for up to 24 hours (see Supplementary video).

Figure 2. Device with bacteria droplets, 1 droplet per habitat.

Figure 3. An ‘upright’ petri dish + kimwipes + device + coverslip ready to be incubated.


  1. Recovering from the devices (perform in a BSC): Open petri dish, carefully remove and discard kimwipes and then use sterile tweezers to gently unseal the device and place face up in the lid of the petri dish. By around 12 hours, the spaces between the habitats will be void of liquid from PDMS absorption, preventing microbes from being mixed across chambers during disassembly. Habitats that have dried out will appear white (Fig. 4) and cannot be used.  Dip sterile inoculating loop into an eppendorf with PBS, then use that loop to scrape one of the habitats (Fig. 5).  Dip that inoculating loop back into the eppendorf media again, which can then be grown overnight for further analyses such as plating for relative cell count (if there are different strains) and other molecular analyses. Repeat for the rest of the habitats that you are interested in, using new inoculating loops. The PDMS device can now be cleaned as in Step 1 and reused again.

Figure 4. View of an inoculated and incubated device, looking through the bottom of a petri dish.


Figure 5. Recovering bacteria from a habitat in the disassembled PDMS device.


What else should I know?

The recovery technique can be used to estimate relative proportions of different types of microbes (e.g. morph frequencies) which is useful when performing competition assays and evolutionary experiments. Unlike in Tekwa et al. (2015), this technique forgoes the use of a confocal microscope; assessment of the contents of the device is instead performed through direct microbe recovery and standard plating procedures.


Links to Videos

These videos go through the specific procedure that we used to perform experiments on competition and cooperation in Pseudomonas aeruginosa and may be useful in determining specific amounts of media, growth times, etc. that may be utilized for experiments with similar PDMS microfluidic devices.

Part 1 – Intro + Washing the Devices https://youtu.be/Bne3ZN3wU4Q

Part 2 – Inoculating the Devices https://youtu.be/p-UYIRreYyM

Part 3 – Recovering from the Devices https://youtu.be/YLnmGxqMYgE

Supplementary – Fluorescent Bacteria Experiment https://youtu.be/lgMtryS62pA


Acknowledgements

AGr was supported by an NSERC Undergraduate Student Research Award and by an NSERC Discovery Grant. EWT was supported by the Fonds Québécois de la Recherche sur la Nature et les Technologies and the Québec Centre for Biodiversity Science. AGo was supported by the Canada Research Chair program and NSERC Discovery grants. DN was supported by a CFI Leaders Opportunity Fund (25636), a Burroughs Wellcome Fund CAMS award (1006827.01) and a CIHR salary award.


References

Cho, H., Jönsson, H., Campbell, K., Melke, P., Williams, J. W., Jedynak, B., … & Levchenko, A. (2007). Self-organization in high-density bacterial colonies: efficient crowd control. PLoS biology, 5(11), e302.

Connell, J. L., Ritschdorff, E. T., Whiteley, M., & Shear, J. B. (2013). 3D printing of microscopic bacterial communities. Proceedings of the National Academy of Sciences, 110(46), 18380-18385.

Folkesson, A., Jelsbak, L., Yang, L., Johansen, H. K., Ciofu, O., Høiby, N., & Molin, S. (2012). Adaptation of Pseudomonas aeruginosa to the cystic fibrosis airway: an evolutionary perspective. Nature reviews. Microbiology, 10(12), 841.

Hol, F. J., & Dekker, C. (2014). Zooming in to see the bigger picture: Microfluidic and nanofabrication tools to study bacteria. Science, 346(6208), 1251821.

Keymer, J. E., Galajda, P., Lambert, G., Liao, D., & Austin, R. H. (2008). Computation of mutual fitness by competing bacteria. Proceedings of the National Academy of Sciences, 105(51), 20269-20273.

Or, D., Smets, B. F., Wraith, J. M., Dechesne, A., Friedman, S. P. (2007). Physical constraints affecting bacterial habitats and activity in unsaturated porous media – a review. Advances in Water Resources, 30(6), 1505-1527.

Park, S., Wolanin, P. M., Yuzbashyan, E. A., Silberzan, P., Stock, J. B., & Austin, R. H. (2003). Motion to form a quorum. Science, 301(5630), 188-188.

Tekwa, E. W., Nguyen, D., Juncker, D., Loreau, M., & Gonzalez, A. (2015). Patchiness in a microhabitat chip affects evolutionary dynamics of bacterial cooperation. Lab on a Chip, 15(18), 3723-3729.

Tekwa, E.W., Nguyen, D., Loreau, M., Gonzalez, A. Defector clustering is linked to cooperation in a pathogenic bacterium. In review.

Digg This
Reddit This
Stumble Now!
Share on Facebook
Bookmark this on Delicious
Share on LinkedIn
Bookmark this on Technorati
Post on Twitter
Google Buzz (aka. Google Reader)