Dave Hubera and Sumita Pennathurb
a Stanford Genome Technology Center, Stanford University, Stanford, CA, USA
b Department of Mechanical Engineering, University of California, Santa Barbara, CA, USA
Why is this useful?
Lab on a Chip devices fabricated with silicon dioxide or glass substrates represent the gold standard for many applications due to their robustness and repeatability. However, fabricating these devices can be time consuming and expensive, particularly compared with devices created using rapid prototyping methods such as PDMS molding. Therefore, in this edition of “chips and tips” we highlight a few of the issues that arise when designing and microfabricating fluidic devices and suggest tips that, we hope, will save you time, money, and perhaps another trip to the clean room.
1. Finding yourself – registration marks
Identifying a location in a channel with high precision can be very difficult, particularly when you are observing long stretches of otherwise featureless channels through high magnification objectives. While this can be accomplished with expensive, high-resolution, motorized stages, it can also be accomplished elegantly using on-chip registration marks, such as rulers or other indicators. Registration marks can be designed and fabricated with very little additional effort, by adding them to your channel mask design and subsequently etching the marks and fluidic channels in the same step. But beware; if registration marks are too close to channels, minor lithography and etching errors can result in a poor seal and lead to leaks. Recall that isotropic etching will produce channel (and mark) widths larger than the dimensions in the mask, so it is necessary to account for the final widths when positioning your marks relative to the channels.
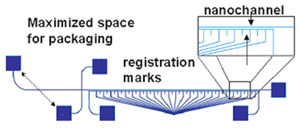
- Figure 1: Schematic of a nanofluidic separation device with the following design considerations: 1) maximized space for packaging between the inlet holes, 2) on chip filters at the inlets, and 3) registration marks below the separation channel. In this particular design the registration marks are a separate, contiguous channel that can be filled with dye to aid in locating the adjacent separation channel (see Tip 5).
Ultimately, the selection of mark location relative to the channel is application dependent. For greatest convenience, the marks and channels should appear within the same field of view on your microscope. However, if your detection signal is very low, the presence of the marks may introduce additional noise (see tip 5). In this case, it is preferable to locate your registration marks outside the field of view containing the channels. Figure 1 shows a cross-channel design that includes tick marks underneath the separation channel.
2. Keeping it clean – on chip filters
All microfluidic chips eventually accumulate debris within the channel that can compromise performance or, worse, block the channel entirely. Incorporating filters into your channel can help extend the working life of your devices. These on-chip filters can be structures like pillars and, like registration marks, can be included in a design with little or no extra fabrication costs. However, the design of the filter regions is critical if they are to successfully protect your channels without introducing other problems. For example, when significant dead volumes are present, it becomes difficult and time-consuming to exchange samples or buffers because you must rely on diffusion to clear previous solutes from the dead volumes. Figure 2 shows leakage of a fluorescent analyte from dead volumes at the corners of a square filter pad. Here are some design considerations for on-chip filters:
- Dead volumes arise when areas are not effectively flushed by fluid flow through the device. The filter shape should ensure that all regions experience approximately the same magnitude of fluid flow. Also, sharp corners should be avoided. If necessary, lengths should be minimized to decrease the distance over which analytes must diffuse to escape the corner’s dead volume.
- Large particles are excluded from the channel by the filter elements. Consequently, filter elements should be sized to exclude the greatest number of particles. However, the spacing between the elements should not be significantly smaller than the dimensions of the main channels or they can influence the behavior of the device. For example, a spacing below 1 µm can result in concentration polarization effects due to the influence of the electric double layer.[1]
- Small particles are trapped via adsorption to filter walls. Trapping efficiency increases with the residence time of particles within the filter. Thus, the filter area should be large relative to that of the channel.
- The positioning of via holes may vary significantly, particularly if alignment of the channel and lid wafers is performed by eye (with no alignment tool) prior to bonding. The design should allow for variation in the mating of the lid and the channel wafer, to ensure that filters are not bypassed by slightly misaligned via holes.
A simple on-chip filter schematic that minimizes dead volume is shown in Figure 2(b). Many other designs are possible, and tradeoffs may be made between flow uniformity and areal expansion at the entrance to the filter. Note, also, that filter designs can vary based on the design of the vias.
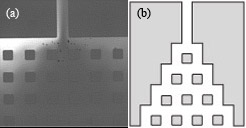
- Figure 2: (a) Square on-chip filter design showing leakage of fluorescent dye from the corners of the filter. The dark region in the center indicates the region effectively flushed by fluid flow. In such designs, buffer or analyte exchange is extremely difficult due to dead volume in the corners. (b) A sample design that minimizes dead volume.
3. It’s not just the inside, the outside counts – fluidic interconnects
Many researchers have difficulty interfacing their microfluidic device with off-chip tubing, syringes, etc. In a previous edition of Chips and Tips, the authors described a quick and cheap syringe tubing interface.[2] Other solutions include commercially available options such as Labsmith[3] and Upchurch[4] fittings. However, whichever interface you select, you must remember to allocate sufficient space for the connections on your device. In general, these connectors are orders of magnitude larger than channel widths, and it is not uncommon to have channel lengths about the size of a fitting. If a channel is too short, the fittings will overlap. Even if they fit on the chip, the fittings may be so close as to interfere with their operation (e.g., loosening and tightening, adding or removing tubing) or with device function (e.g., introducing reflected light or autofluorescence into the detection region). If the channel length must be on the order of the fitting size, we recommend that you design the ports such that you can maximize the space between them, for an example, see Figure 1. Finally, be aware that the change in volume between the interconnect and the inlet of the microfluidic device may induce flow effects, such an nonlinear electrokinetic instabilities in the case of electroosmotic flow, and geometry induced vortices at sharp corners[5] – so be careful to design the channel to be long enough to neglect these (mostly harmful) hard-to-predict entrance effects in the main part of the channel.
4. Getting it together – bonding
Poor bonding between a channel wafer and its cover plate is a common cause of device failure. It is particularly frustrating because bonding is the last significant fabrication step, after many hours have already been invested. Many different bonding techniques (e.g., sacrificial bonding layers[6], spin-on glass[7-8], low temperature annealing with NaOH[9], and adhesive bonding[10]) have been developed; however, fusion bonding remains the most robust and reliable option for glass devices that can withstand the high temperatures required. Therefore, we present a recipe (including a few tricks) to help achieve reliable fusion bonds between glass substrates:
- Before processing, ensure your substrates are sufficiently flat. Inexpensive commercial glass wafers are often not flat enough to achieve a fusion bond. If this is your only option, however, we recommend that you lap and polish the wafers prior to any processing. Both the top and bottom substrate of the microfluidic chip must be lapped and polished.
- Clean and process your wafers. Avoid processes that will roughen the bonding surface on the wafer because this reduces the surface area available for bonding and may lead to weakened substrates.
- After processing, thoroughly clean both top and bottom substrates using the following recipe. Particulates or films will interfere with bonding. 20 minute clean in H2SO4 (90%) + H2O2 (10%) at 115º, 10 minute rinse with deionized (DI) water, spin rinse and dry (or dry very carefully by hand with clean nitrogen) .
- Hydrolyze the channel and cover wafers with a standard RCA1 clean, listed below, in order for the wafers to be completely clean and particulate free for the mating step. 10 minute clean in H2O (70%) + H2O2 (15%) + NH4OH (15%) at 80ºC, 10 minute rinse in DI water, spin rinse and dry (or dry very carefully by hand).
- Remove the native oxide that has formed on the wafers during processing with a short HF dip. The etch should be sufficiently short to remove the oxide without etching the underlying channels. 20 second dip in 50:1 HF, 10 minute rinse with DI water, spin wash and dry (or dry very carefully by hand).
- Once the wafers are dry, position the channel wafer over the cover wafer such that your features align, then press the wafers together. In a successful bond, you will see a wave of fringe patterns progress across the wafer, as the Van der Waals forces cause the wafer to pre-bond. (It may be helpful to lightly bow one wafer by pressing on the center of one wafer, then releasing the wafer edge once contact is made in the center.) These fringe patterns (or Newton rings) indicate the topology at the interface of the wafers and are only visible when the wafers are in intimate contact. Particles will be surrounded by fringes (the number of fringes indicating the height of the particle). In a perfect bond, all fringes will appear at the edge of the wafer. If many particulates or fringes appear across the wafer, the bond will likely be poor, so separate the wafers and repeat steps 1-5.
- Place pre-bonded wafers in an oven (no vacuum needed, no weight needed) for 4-5 hours at the softening temperature of the material (500-600ºC for borofloat glass, 1100-1200ºC for quartz and fused silica). We recommend ramping the temperature to the softening temperature, so as not to induce thermal stresses within the material.
5. You’re special – special considerations for nanochannels
Nanochannels offer interesting new opportunities for studying nanoscale physics and performing fluidic operations on a scale less than that of a single cell; however, their size and the interfacial effects associated with their large (relative) surface areas introduce additional concerns. Channel filling is a significant one and is generally accomplished via capillary action. To do so, avoid introducing hydrophobic regions at the entrance of your channel (e.g., gold electrodes) and ensure your channels are not too long. Of course, “too long” is dependent on your channel dimensions, for example, a 100 nm tall nanochannel longer than 50 cm will not fill successfully via wicking alone. For long channels or adverse wicking conditions, you will need to apply pressure-driven flow. The challenge with nanochannels is that their hydraulic resistance is large and high pressures are required to generate appreciable Poiseuille flow. These pressures can easily be larger than those generated by syringe pumps (over 200 psi) and require high pressure fittings and interconnects. Pressure filling in nanochannels can also introduce bubbles in the channel which are almost impossible to remove.
In nanoscale devices it can be challenging to locate the channels. When channels are sufficiently wide, they can usually be seen under brightfield imaging, when channels are narrow (< 1µm) or nanofluidic chips are used for fluorescence measurements (i.e., in the dark), it is extremely difficult to find them, and the use of registration marks (see Tip 1) is critical. When using registration marks with nanochannels, we recommend connecting the marks together into a parallel channel system with its own inlet and outlet. The marks can be then be filled with fluorescent dye. In this way, you can both locate the channel and also use the fluorescence intensity of the marks as a reference. However, keep in mind that the fluorescence from the channel may overwhelm the signal of a low concentration or dim analyte, so you may want to design the marks to be located just outside of the channel field of view.
References
[1] F. C. Leinweber, U. Tallarek, Langmuir, 2004, 20, 11637-11648.
[2] R.Martinez-Duarte and M. Madou, Quick and cheap syringe-tubing interfacing, Chips & Tips (Lab on a Chip), 26 June 2007.
[3] http://www.labsmith.com
[4] http://www.upchurch.com; A. Persat, T. Zangle, J. Posner and J. Santiago, On-chip electrophoresis devices: do’s, don’ts and dooms, Chips & Tips (Lab on a Chip), 26 March 2007.
[5] A. P. Sudarsan, V. M. Ugaz, Proc. Natl. Acad. Sci. U.S.A., 2006, 103, 7228-7233.
[6] A. Sayah, D. Solignac, T. Cueni and M. A. M. Gijs, Sens. Actuators, A, 2000, 84, 103-108.
[7] A. Satoh, Sens. Actuators, A, 1999, 72, 160.
[8] R. Puers amd A. Cozma, J. Micromech. Microeng., 1997, 7, 114.
[9] S. C. Jacobson, A. W. Moore, and J. Ramsey, Anal. Chem., 1995, 67 , 2059.
[10] Y. J. Pan and R. J. Yang, J. Micromech. Microeng., 2006, 16, 2666-2672.


