David J. Guckenberger,*a Jake Kanack,*a Loren Stallcop,b David J. Beebea
aDepartment of Biomedical Engineering, Wisconsin Institutes for Medical Research, University of Wisconsin-Madison, Madison, WI, USA
bDepartment of Materials Science and Engineering, University of Wisconsin – Madison, Madison, WI, USA
* Authors contributed equally
Why is this useful?
With several microfabrication techniques now available, including: 3D-printing,1 micromilling,2 and hot embossing,3 in-house fabrication of thermoplastic microdevices has become cheaper, faster, and easier. However, for many applications – such as cell culture and microscopy – these devices must be bonded to optically-transparent substrates such as glass. While bonding similar materials, such as Polystyrene (PS) to PS, is relatively simple, bonding dissimilar materials, such as PS to glass, presents a particular challenge. Current methods to circumvent these challenges include spin coating adhesives, such as polydimethylsiloxane (PDMS), onto sacrificial substrates4 and injecting adhesive directly into the bond interface.5 However, equipment requirements, associate long cure times, heterogeneity in glue uniformity, and complexity limit acceptance of these techniques.
Here we present simple technique for applying uniform layers of adhesive to enable rapid – less than a minute – bonding of PS to glass. Using UV-curable adhesives, readily accessible materials, and a simple techniques, we demonstrate how to apply thin uniform layers of adhesive to a microchannel. We provide design suggestions that will improve bonding repeatability, and additional information that may help apply this technique to materials beyond PS and glass.
What do I need?
- Polystyrene (1.2 mm, #ST313120, Goodfellow)
- Glass coverslip (#260450, Ted Pella, Inc.)
- UV curable adhesive (Ultra Light-Weld 3025, Dymax)
- Silicone foam (Textured) (#31943970, MSC Industrial Supply Co.)
- Isopropyl alcohol (#190764, Sigma-Aldrich)
- Low particulate wipers (#TX609, Texwipe)
- Wooden flat stick (#704, Brightwood)
- UV lamp (OmniCure S1000, Exfo)
- Adhesives are often material-specific. Consult the manufacturer to determine the best adhesive for your application.
Tip: Some adhesives may require post-treatment / aging to reach a full cure.
- We have tested this protocol with Ultra Light-Weld 3025 (Dymax) and Norland Optical Adhesive 68 (Thor Labs, Inc.). These adhesives had similar performance, however the protocol may need to be tailored for other adhesives.
- If the adhesive is too viscous or does not adequately wick around the rib, heat may be applied to achieve thinner adhesive layers, or to improve the wicking of the adhesive.
- This protocol is amenable to wide variety of materials, including: cyclic olefin copolymer (COC), glass, metal, PS, and various rapid-prototyping materials.
- Creating the rib and allowing the adhesive to wick eliminates excess adhesive and prevents adhesive from squeezing into the microchannel.
What do I do?

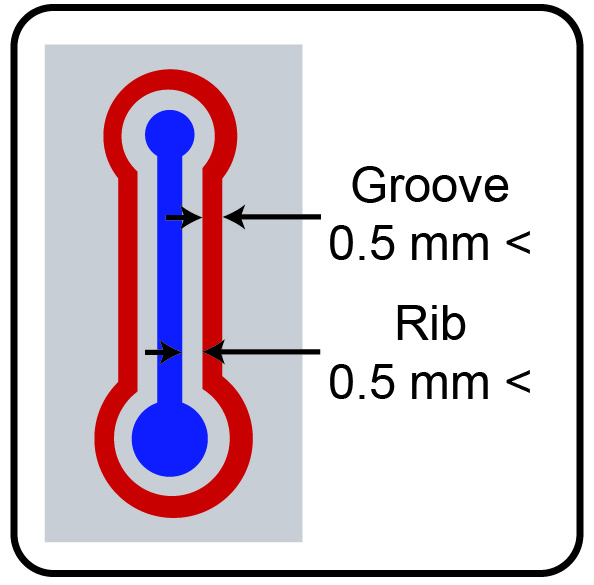
Fig.1 Channel border design

Fig. 2 Process workflow

Fig. 3 Cross sectional image of a PS microchannel bonded to a glass coverslip. Scale bar represent 0.5 mm
• Adhesives are often material-specific. Consult the manufacturer to determine the best adhesive for your application.
Tip: Some adhesives may require post-treatment / aging to reach a full cure.
• We have tested this protocol with Ultra Light-Weld 3025 (Dymax) and Norland Optical Adhesive 68 (Thor Labs, Inc.). These adhesives had similar performance, however the protocol may need to be tailored for other adhesives.
• If the adhesive is too viscous or does not adequately wick around the rib, heat may be applied to achieve thinner adhesive layers, or to improve the wicking of the adhesive.
• This protocol is amenable to wide variety of materials, including: cyclic olefin copolymer (COC), glass, metal, PS, and various rapid-prototyping materials.
• Creating the rib and allowing the adhesive to wick eliminates excess adhesive and prevents adhesive from squeezing into the microchannel.
References
2. Guckenberger, D. J., de Groot, T., Wan, A. M.-D., Beebe, D., & Young, E., Lab Chip, 2015, 15(11), 2364–2378.
3. Young, E. W. K., Berthier, E., Guckenberger, D. J., Sackmann, E., Lamers, C., Meyvantsson, I., Beebe, D. J., Analytical Chemistry, 2011, 83(4), 1408–1417.
4. Gu, P., Liu, K., Chen, H., Nishida, T., Fan, Z. H., Anal. Chem., 2011, 83(1), 446-452
5. Lu, C., Lee, L. J., & Juang, Y. J., Electrophoresis, 2008, 29(7), 1407–1414.


")